Pages

I Am the Guest Designer @ Color Hues Challenge #25


Hello Crafters! Today I have the honor and privilege to be the Guest Designer on the Color Hues Blog! They always have wonderful challenges and pick a winner at the end of the Challenge BUT....since this is Color Hues One Year Anniversary they will be celebrating by picking TWO winners instead of one!
How exciting is that! 


I love butterflies so I knew that I wanted to create them in these two colors with my Pinkfresh Studio Butterflies Stamp, Layering Stencils and Die and create a slimline card.


I made my background layer first by cutting a panel of Gina K Designs white cardstock with a slimline die for the top of my card. After that I die cut a lot of the PFS Leafy Branch Die also in white and glued them down over my white layer to make my own background paper. I then die cut this panel at the top right side and the bottom left side with the PFS Stitched Scallop Circle Die. I let the die hang over the sides of the card a bit before I starting cutting. I die cut a couple more of the circle dies and adhered them under the die cuts from the background layer to give them some dimension. I then dusted them very lightly with my yellow & orange blending brushes (without putting anymore ink on them) to give them a little color. I glued them back onto the background layer along the center part of the circle.


Next I made my Butterflies. These are some the easiest butterflies to put together! For this set there are five different stencils to create these butterflies. For each stencil just pick a color and start blending. I picked Lemon Drop, Sweet Mango, Tangerine Twist, Peach Bellini and Charcoal Brown from Gina K Designs. I also used Peach Fuzz, Marigold and Apricot from Pinkfresh Studio. I actually made two sets of the butterflies — one a tiny bit lighter than the other.


After all of Butterflies were stenciled, I placed them in my MISTI and stamped them in either Chocolate Brown or Kraft. I then re-stamped them again in VersaMark and heat embossed them with GKD Clear Embossing powder. I placed a lot of pop dots under the wings of the butterflies to make them look like they were fluttering in the air! There are two sets of stenciled butterflies and a layer of the same butterfly die cut in vellum so each has three total layers!


For the die cut sentiment I took a small piece of white cardstock and with my blending brushes I inked up the bottom half of the paper with yellow (Wild Dandelion) ink and the top part with orange (Sweet Mango) ink and blended the two colors together towards the middle. Once it was dry I die cut the word "Grateful" out of it and then die cut the sentiment two more times and adhered all three layers together for more dimension. I stamped the words "For You" on a piece of Sweet Mango cardstock and cut it out with a die cut banner. The sentiment die, cardstock and ink are all from Gina K Designs.


The last thing that I did was adhere the top layer to a piece of Sweet Mango cardstock that was die cut from a scalloped slimline die set from Gina Marie Designs and then adhered everything onto a Wild Dandelion card base. I also added jewels on the butterflies backs with Clear Jewels from Katscappiness and yellow & orange jewels from Queen & Company.


I truly hope that you have enjoyed my card today. I feel so honored to share it with you all.

Please feel to play along with this Yellow and Orange Challenge over at Color Hues!

Thank you for visiting my blog today! 
And until next time, Happy Crafting!

Thank You Card - Mod Squad Challenge with Kitchen Sink Stamps

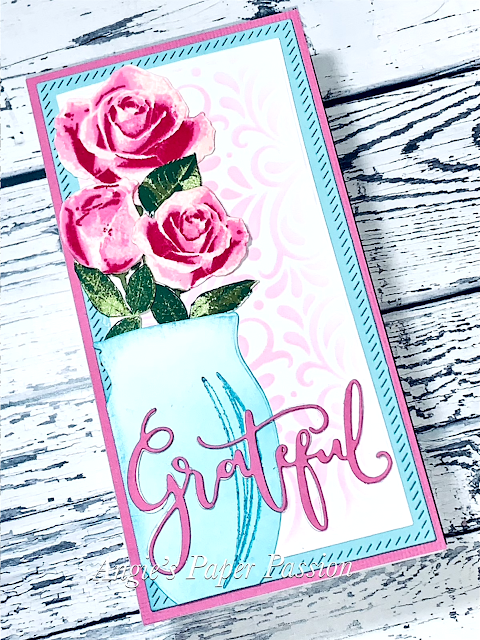
 Hello Crafters! I have created a Mini Slimline Thank You card for Maria Colosimo of Kitchen Sink Stamps. She has the most beautiful stamp sets that I've ever seen! They make very detailed and realistic images. The Modsquad Challenge is to create a Thank You card for Maria using Kitchen Sink Stamps.

I used the very first stamp set that I ever purchased from Kitchen Sink - Hearts & Roses. To create each rose and leaf image there are three to four stamps that you just layer with coordinating ink colors to achieve the intricate and detailed final images. All of her stamps are so detailed and fun to create.

I started with the flowers and used inks from Gina K Designs and Pinkfresh Studio from the palest pink to a really pigmented pink to achieve the look of the roses pictured. This set does not have a die set to match but Kitchen Sink Stamps offers an SVG file with their sets. I can use that SVG file on my Cricut Maker or Explore to cut out all of the images (and as many as I want). After I cut the images with my Cricut I just stamp the cut outs. 

I die cut the white and teal cardstock with the Pinkfresh Studio Mini Slimline Die Cut Bundle. Then I used the Harvest Stencil from Gina K Designs and a pink ink to create a soft background. I die cut the vase from GKD Fearless Joy stamp & Die set to place my roses in and inked it in a teal color.

The 'Grateful' sentiment is a GKD die from the new Fluttering Fall Bundle.

While I was stamping these beautiful roses I decided to grab more coordinating ink colors and made many more roses in different colors for future projects. They are so addicting to make!

Well, I hope that you enjoyed seeing my Thank You card for Maria! I hope she enjoys it also! Hop on over to the Modsquad Challenge Blog and play along!

Thank you for dropping by! Until next time, Happy Crafting!

Love At All Times

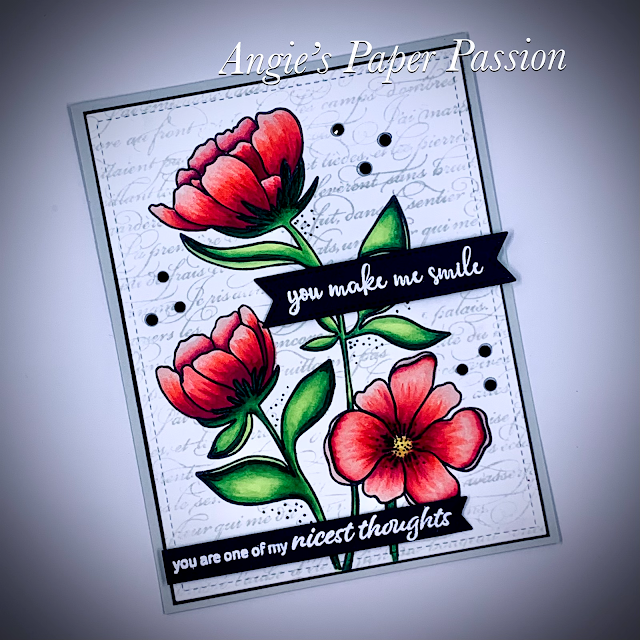
 Hello Crafters! I have a card to share that I have wanted to do for a while. It took some time to make it but I am so happy with the final outcome!


The stamp set is Love At All Times from Gina K Designs. The bottom sentiment is from the same set but the top sentiment is from GKD You Make Me Smile. I heat embossed both sentiments with GKD white embossing powder and die cut them into strips.
 I colored the flowers with my Copic markers (this is why it took a while to complete this card. I am not the best Copic artist!)
After I colored my flowers I stamped the same flower image on to some GKD Masking Magic and fussy cut it out. I placed the Masking Magic over the main flower image to protect the Copic coloring. Then I used a large background stamp from Stampin' Up and stamped over the entire card with GKD Whisper ink.


All cardstock is Gina K Designs - white, black and whisper. 
I added some black jewels from Queen & Co.


I learned a few things while making this card - I absolutely love Whisper cardstock and ink, I also love trying new techniques, and although I don't use my Copics as much as I should, I do love coloring with them and it's very relaxing!

Thank you for visiting! I hope you enjoyed seeing my card and reading how I created it. I love sharing this  passion of mine! So until next time, Happy Crafting!


Time To Coast Masculine Birthday Card


Hello Crafters! I made this card for my nephews birthday. It was out of my comfort zone - I rarely make masculine cards!
I am also entering this card on the Seize the Birthday Challenge - #221 By the Sea! 


So here is my masculine birthday card!


I don't make too many masculine cards so when I need them I struggle with creating them. But I recently bought a new stamp set from Gina K Designs called Time to Coast and it is perfect for so many occasions including masculine cards.

This card is for my "little" nephew. Not really! Even though I am his Aunt, I am younger — by six months! So we grew up almost like brother & sister. 


I stamped the sailboat on a piece of white cardstock that is 5.5" x 4.25". I like to start with my cardstock a little bit bigger than I need because I will be die cutting it down later. I also stamped another sailboat onto a piece of GKD masking magic masking paper that I fussy cut out. I carefully placed my masking paper sailboat over the stamped one on the cardstock. With the masked boat in place, I take a piece of scratch paper and place the straight edge on the cardstock where the 'horizon' would be and hold it in place. Using my blending brush I ink the bottom half with GKD Sea Glass, Blue Lagoon and Tranquil Teal. After I was satisfied with my 'water' I replaced the scratch paper to the bottom and lined up the straight edge with the top of the blue 'water' to start working on the sky.


I used the Cloud Edger Stencil from A Colorful Life Designs and GKD Ocean Mist to create billowing clouds. I then used the Sunshine Stencil from GKD and Lemon Drop ink to create the sun and sun rays. After the sky and water are finished I carefully peel the sailboat mask off. Now it doesn't have any of the inks on it and I can color it in with another coloring medium.


I used GKD Master Layout #1 to die cut the panel out and a piece of Tranquil Teal. I stamped the sentiment onto the bottom of the front panel but made a little mistake. Instead of starting all over, I re-stamped part of the sentiment onto a piece of Tranquil Teal Cardstock and die cut it out with a banner from GKD Master Layout #3 and adhered it over the 'mistake'! I stamped a few birds in black ink in the sky and used a Sakura white Gelly Roll pen to draw in some whitecaps into the blue water. I asked my nephew what his favorite colors are and that's what I choose to color the sailboat. I used my Prismacolor Pencils and Gamsol. 


Now that the coloring and inking are done, I adhered the layers together and put them onto a Kraft top folding card base. 

I even continued the theme to the inside of the card and on the outside of the envelope (which I forgot to photograph). This stamp is also from the Time to Coast stamp set.

Hop on over to the Seize the Birthday Challenge and have a little fun with their challenges!

I hope that he enjoys it and you do as well! Thank you for visiting and until next time,

Happy Crafting! 

Winner of the Color Hues Challenge!!!


 I am so thrilled!!! I am the winner of the Color Hues Challenge - #23 Yellow & Pink! It is an honor that my card was chosen among so many beautiful cards that were submitted to the challenge. I have been asked to be a Guest Designer on the Color Hues Challenge Blog next month. This is very exciting and I am eager to share my card for the new challenge!

Here is my card that was chosen:


Make sure to look for my post at the beginning of September for my Guest Designer spot on the Color Hues Challenge Blog! Thanks for visiting and until next time, Happy Crafting!

Gina K. Designs Color Challenge

 This week there was a color challenge in the FaceBook group Gina K Designs & Stamp TV. The colors that I got from this photo are Blue Denim, Tranquil Teal, Key Lime, Jelly Bean Green and Fresh Asparagus inks — all from Gina K Designs.

Here is the challenge photo:

May be an image of text

I love the colors but I didn't want to do a nature landscape. The first stamp set that I thought of was Melanie Muenchinger's Fresh Flowers Stamp & Die set! After using it I fell in love with it and I will be making more cards with this set — a lot more!

This card is inspired by Melanie! It's a Mini Slimline card and measures 6.5" x 3.5"


Melanie did a fantastic job designing this gorgeous set — and there are dies to match!!! There are multiple flowers, stems, leaves and beautiful vases included in the set.

I picked one of the vases and stamped it twice in GKD Blue Denim and Tranquil Teal. It helped the blending of the two colors to actually use my blending brush to tap the color onto the stamp instead of putting the stamp pad directly to the stamp. The blending brush gave it a much more softer look and the colors blended so much better. I then stamped two flowers Tranquil Teal with Blue Denim in the flower centers and die cut both flowers and the vase with my Vagabond 2.


For the card background I used the GKD Harvest Flourish stencil and inked it with Key Lime heavier in the center and a little more lightly towards the edges. I knew where I wanted the flowers & the vase to go so I stamped the stems and leaves on the panel so that when it was finished they looked like they were trialing up and to the right. I stamped the stems in Fresh Asparagus. With the leaves I used my blending brush technique like I did with the vase. I first stamped the leaves in Jelly Bean Green then I added the darker Fresh Asparagus with my brush and tapped it at the base of each leaf stamp. 


I finished the card by rubbing Key Lime ink very lightly with my blending brush at the very bottom. This grounds the vase so it won't appear to be 'floating' on the card. I adhered the vase and flowers to the card with pop dots and stamped the sentiment in Blue Denim. This top layer is adhered onto a piece of Tranquil Teal cardstock and then both were adhered to a Key Lime card base with a piece of foam in between to give it a little depth. I used PinkFresh Studio Mini Slimline Bundle Set for the layers.

I hope that you will be inspired to get a stamp set out that you haven't used yet and create something special! I have more cards waiting to be posted that were created for and inspired by a few more challenges. 

So until next, Happy Crafting!


Happy Birthday Slimline Card


Hello Crafters! I have another card to share with you today (yes, I am on a crafting roll)! My little blog hasn't seen this much activity in a long time but crafting is my outlet and personal therapy. 

Today I have a slimline birthday card that I made for the Seize the Birthday blog. Slimline cards are not new but they have made a very popular comeback recently and I love making them. Since they came back on the scene in the last couple of years many companies have released slimline dies. I bought one set in 2020 but ONLY one since I figured that I could always cut a rectangle with my paper trimmer. Hahaha, THAT didn't last long! I now have several slimline die sets! Slimline cards are usually 9"x4" or 8.5"x3.5". I have only made the latter size since it uses a little less cardstock. Slimline cards will fit into a regular sized business envelope (a #9 or a #10) without any extra postage. 


For this card I used one of my new favorite companies, Pinkfresh Studio. They have the most amazing layering stencils! They make me feel like a 'real' artist after I finish. This stencil set is called Heartfelt Thanks and I stenciled it with Pinkfresh Studio inks in three different shades of pink, two shades of green and a yellow. After I stenciled the design I fussy cut it out on the right side only and popped it up with pop dots it over another panel that I stenciled with the Pinkfresh stencil called Horizontal Stripes. I then layered them over a panel that I die cut with a Catherine Pooler die called Post This (thanks Sue 😊).


For the sentiment, I inked a piece of white cardstock with the darkest pink that I used in my stenciling and die cut the word 'Birthday' from Gina K Designs from it. If you ever need a certain color of cardstock to die cut but don't have it just use your inks! I also die cut the word out of white cardstock four more times and adhered them all on top of each other to create a very dimensional die cut. I then die cut the shadow out of vellum. I stamped the phrase "wishing you a happy" from Gina K Designs Lace Flowers stamp set in the same pink color and die cut it out with the banner die from GKD Master Layout #3 die set.


After putting the card together I added pink jewels from Queen & Co. 

If you get a chance check out the Seize the Birthday blog! I am adding this card there for their card challenge using stripes in a birthday card. 

Thank you for visiting! I will be posting another card again very soon. 

So until next time, Happy Crafting!

A Mod Squad Challenge, A Thank You Card & Gina K Designs


Hello Crafts! This month the Mod Squad Challenge Blog is giving thanks to their sponsors and this week the thanks goes to Gina Krupsky of Gina K Designs. It is so appropriate that this card is for Gina since I started following Gina, watching her weekly videos, making cards along with her (and buying as much as I can hide from my DH 😂), and joining her online group at the very start of the lockdowns last year 😷! Through all of this and with Gina's creative inspiration it really helped me get my mind off of what terrible things were going on in the world. So I am grateful for Gina being so uplifting and motivating me to continue to create. I am very honored to make a thank you card for her!


I used Caring Flowers and Sketched Flowers Stamp Sets to create this card. I stamped the flowers from the Caring Flowers set in GKD Black ink. I then colored the entire image with my Prismacolor pencils and gamsol. If you've never colored with pencils and gamsol you need to watch this video. Gina shows you exactly how to do this!


After coloring, I used a black glaze pen and a white Gel Roll pen (both by Sakura) to define the stamens in the center of the three flowers. I die cut the panel down with a Lawn Fawn Small Stitched Rectangle Stackables die and die cut a black cardstock layer with a GKD Master Layout #1 die.


I then stamped the sentiment from the Sketched Flowers stamp set in VersaMark and heat embossed it with GKD black embossing powder. 

I adhered the top two layers onto a Tranquil Teal card base. I always love to add a little something to finish my cards off so I grabbed Gina's Clear Dew Drops and glued a few here and there on the card using Connect Glue!

I stamped a sentiment on the inside from the Friendship Blooms stamp set and stamped two of the inside corners with the Caring Flowers stamp in Tranquil Teal. I even stamped the front corner and back flap of the envelope with the same stamp. 


My Thank You card is finished and ready to send to Gina! She gives so much of herself to all of us each week and I'm just giving her a small bit back to let her know that everything that she does is very much appreciated. 

Thank you also goes to the Mod Squad Challenge Blog for this great challenge!

So until next time, Happy Crafting!

Supplies used: 
Stamps - Caring Flowers, Sketched Flowers, Friendship Blooms
Cardstock: GKD White, Black, Tranquil Teal 
Pencils: Prismacolor
Gamsol
Pens: Sakura Black Glaze, GellyRoll 
Embossing Powder: GKD Black
Ink: VersaMark, GKD Black
Dies: GKD Master Layout #1, Lawn Fawn Small Stitched Rectangle Stackables
GKD Clear Dew Drops

Color Hues Yellow & Pink Challenge #23 and Honey Bee Stamps Coneflower

Hello Crafters! I've decided to take on a few card challenges and the first one is over at Color Hues. Their challenge is to use Yellow & Pink as the focal color.

As soon as I saw this challenge I knew immediately that I wanted to create something with my new Coneflower dies from Honey Bee Stamps! I love this set and it's so hard to not want to grab it each time that I want to make a card. Here is my card!


I die cut the flower from Gina K Designs heavyweight white cardstock and blended GKD Wild Dandelion, Sweet Corn, Prickly Pear, Dusty Rose and Passionate Pink inks onto the six different layers of the flower and adhered them together. I popped the petals up using pop dots. 


I used a stencil from A Colorful Life Designs and two of the yellow inks to make my own background for the card. I cut three large and three small frame dies from PinkFresh Studio and adhered them together for a little dimension and placed them on my background panel and used pop dots to adhere the coneflower in the middle. The sentiment is a stamp and die also from PinkFresh Studio that I heat embossed in gold. Gold just seemed to compliment the GKD Kraft cardstock that I cut my frames from. To finish it off, I added some yellow & pink gems from Queen & Co.

This is my first time playing along with the color challenge at Color Hues and I can't wait for their next challenge! 


I'll be posting more cards that I made for challenges this weekend so until next time, Happy Crafting!


Christmas Cards in July using Gina K. Designs

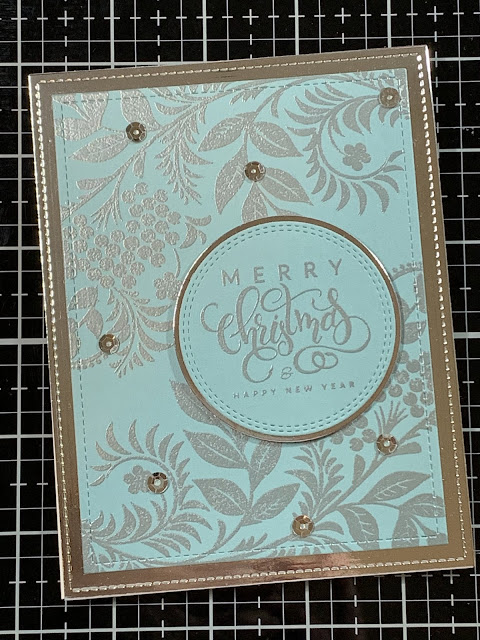
For the next set of cards that I created I used Gina K Designs Sparkle and Shine stamp set. This is a wonderful set that includes the images below plus a round ornament and Christmas tree. I stamped the image and sentiment in VersaMark and embossed it with silver embossing powder (on light blue cardstock) & gold embossing powder (on red cardstock). I die cut the sentiments and adhered them with pop dots to the 'ornaments' then die cut the card panels and layered them onto silver and gold cardstock. I used GKD master layout dies. I then added sequins to the fronts.


Thanks for visiting my blog - I hope that I have inspired you to create something! 
I have a few more Christmas cards that I will share in my next post!

Until then, Happy Crafting!

Christmas in July Cards using Gina K. Designs

Here is my next set of my Christmas cards using Gina's Holiday Tapestry stamp set. This set is so versatile! Although it's a Christmas set the tapestry images can be used all year. Again I embossed the image and sentiments in gold & silver and layered the card panels on gold & silver cardstock. I also made some gold embossed images on red and gold cardstock but I didn't get photos of them. Gold and silver sequins were also added.


  Thank you for visiting my blog. I have a few more Christmas cards to share with you soon!

Until then, Happy Crafting!

Christmas in July Cards using Gina K Designs

Hello Crafters! Since we only have six months until Christmas (gasp!),  it's time to start working on this years cards. But first I wanted to post the cards that I made in 2020 since I hadn't before. I made roughly 45 - 50 cards last year for not only friends and family but also for a card swap for members of a Facebook group that I belong to. I made 4 different card designs changing the colors slightly for each design.

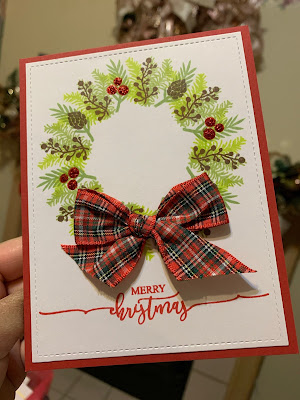
This first one is probably my favorite! I used Gina K Designs Wreath Builder template, Holiday Wreath Builder stamp set and the Scripty Holiday stamp set. Using the wreath builder makes creating cards so simple! Once I knew which stamps I wanted to use and a design that I was happy with, I made the first card. After that first one was complete, the rest were easy and I made them all while watching TV. 


I used two different ribbons from my stash and red Stickles for the berries.


Below is my work in progress using the wreath builder:


This was one of my favorite Christmas cards that I created last year and 
I may use my new Gina K Wreath Builder for this years card!


Thank you for visiting my blog. I hope that you found some inspiration here. 
I'll share some more of my Christmas cards in my next post!

Thank you so much for visiting!
Until next time, Happy Crafting!