Showing posts with label Gina K. Desings. Show all posts

Christmas in July Cards using Gina K Designs

Hello Crafters! Since we only have six months until Christmas (gasp!),  it's time to start working on this years cards. But first I wanted to post the cards that I made in 2020 since I hadn't before. I made roughly 45 - 50 cards last year for not only friends and family but also for a card swap for members of a Facebook group that I belong to. I made 4 different card designs changing the colors slightly for each design.

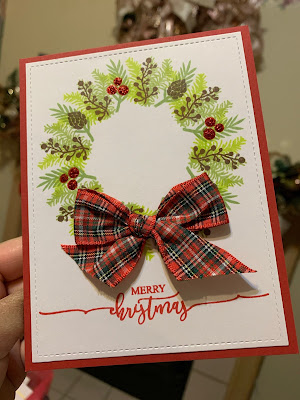
This first one is probably my favorite! I used Gina K Designs Wreath Builder template, Holiday Wreath Builder stamp set and the Scripty Holiday stamp set. Using the wreath builder makes creating cards so simple! Once I knew which stamps I wanted to use and a design that I was happy with, I made the first card. After that first one was complete, the rest were easy and I made them all while watching TV. 


I used two different ribbons from my stash and red Stickles for the berries.


Below is my work in progress using the wreath builder:


This was one of my favorite Christmas cards that I created last year and 
I may use my new Gina K Wreath Builder for this years card!


Thank you for visiting my blog. I hope that you found some inspiration here. 
I'll share some more of my Christmas cards in my next post!

Thank you so much for visiting!
Until next time, Happy Crafting!


Foiled Butterfly Slimline Card

 Hey Crafters! Today I have a card that I created for the Beautiful Butterflies Mod Squad Challenge. This challenge gave me the chance to use a new (to me) product - Gina K Designs/Therm-O-Web Stamp N Foil Foil-Mates Detail Sheets. I recently purchased a laminator, toner sheets, and a lot of foils! These Foil-Mates are called Butterfly Kisses and also has a stamp set and die set that comes separately (but of course I had to have them all!)


I decided to make a slimline card so I could put more of those butterflies on my card. I ink blended four colors onto my card front - Gina K's Passionate Pink, Sweet Mango, Turquoise Sea and Wild Lilac. Part of the butterfly wings come ready to foil but I stamped them in the same inks that I used on the card front and then I ran them through my laminator with the same color of Gina K Fancy Foils. It is so hard to see the beautiful and shiny foil in photographs unfortunately.


I used a sentiment from Lawn Fawn Butterfly Kisses (just a fun coincidence that both companies have the same name!) and heat embossed it with white embossing powder from Gina K. 


I die cut the sentiment and the postage stamp shape from Gina K Designs Master Layout #4. All of the elements are popped up on pop dots. 

I hope that you like my card for today! My new laminator has been getting a workout and I will post more cards that I've made using foiled elements and more info on the laminator itself. I will be adding this card to the Mod Squad Challenge! Thanks so much for visiting!

Until next time, Happy Crafting!

So Grateful For You

Since it's Thanksgiving week I am continuing with a card that can be used for Thanksgiving or just to send to someone that you feel grateful for. 

I used Gina K's Wreath Builder Template again (Yes! I love this whole system!) with the Wreath Builder Stamp Set and Gina K inks. The wreath is on a 4 inch square white cardstock and after stamping the wreath I die cut a circle right in the middle of it. Then I stamped the sentiment onto green cardstock and placed it behind the wreath and popped up the wreath panel with pop dots. I punched the bottom of the green cardstock with a Martha Stewart border punch.


I finished embellishing my card by adding an older piece of Stampin' Up ribbon (It pays to hoard a little 😂). 

And again I added some cardstock layers and a little stamping to the inside of the card.


I am so grateful for my husband, my daughter, my son & his wife and my three wonderful grandchildren. I am also grateful for my sister and brother (we are the only ones from our immediate family left 😢), and the rest of my extended family and friends! I'm grateful for my health and my home. Even with so much uncertainty and fear going on in the world this Thanksgiving I know that I am blessed and I am so thankful to God for all the blessings I have! 

God bless you all this Thanksgiving Day! Stay Safe  - Wear your mask - And Craft! 

Until Next time, Happy Crafting

Thankful, Grateful, Blessed

Hello Crafters! I have a Thanksgiving card to share today. I really enjoyed creating this one because I used some new (to me anyway) tools and techniques. Most of the supplies are from Gina K Designs - my new favorites! 

Gina has a Wreath Builder system that is so easy to use but the results are spectacular! 
Here is the link to the Wreath Builder Templates:


With these two templates you can create the most beautiful stamped wreaths for cards and so much more. Gina has several wreath builder stamp sets to go with the templates but you can really use any stamp set that has small to medium stamps included.

So here is the Thanksgiving card that I made with the Wreath Builder -


Along with the Wreath Builder Template I used the Wreath Builder Stamp Set, the Autumn Wreath Builder Stamp Set, the Take Care Stamp Set and Gina K inks to create the gorgeous wreath at the center of my card. I stamped the sentiment and the circle border - both from the Autumn Wreath Builder Stamp Set  - then cut it out with a circle die cut which I popped up with pop dots in the wreaths center. 
The lower background looks like patterned paper, doesn't it? Nope, its plain white cardstock that I used a stencil on. It's the Gina K Designs Sassy Stripes Stencil (love that name 😊)


I turned the stencil so that the stripes were vertical, taped the paper to it and, using a blending brush, blended the ink onto the cardstock. Always start blending with a very light hand and if you need more color just add a little more ink but use that light hand. Trust me, a lighter touch is key to blending!

Since I don't have some of those 'fancy' dies, I took a die that I do have and used it in a different way! The bottom scalloped on the top two layers was cut using a Lawn Fawn Scalloped Rectangle die. I put the corner of my two top layers into the corner of the die making sure that the rest of the card was on top of the die as it went into my Vagabond.
 
For a finishing touch, I added three coordinating buttons and some twine. 


Here is a peak inside my card. I love putting a little something on the inside to make it look just as nice as the front of the card. I used the same stamps that I used in the wreath on the front and stamped them on the bottom inside corner.


I hope that you enjoyed seeing this card as much as I enjoyed making it! So until next time, Happy Crafting! 


Halloween Cards


Yes, I know, Halloween is over but I'd still like to share the cards that I made for my and my friends grandchildren this year. 

For this first card I used Gina K. Designs Haunts and Harvest stamp set for the trio of ghost and the sentiment and used the coordinating die set to die cut the ghosts. Gina's inks were used with her Fizzy stencil to create the orange and purple background and I then cut it out with the Master Layouts 1 Die Cut set along with a piece of black cardstock. I layered those two onto a tent fold 5 1/2" x 4 1/4" base. 


To add a demential element, I glued googly eyes to the ghosts with Gina K Connect Glue.


Did you really think that I could stop there? Of course not! I had to add an Action Wobble behind the three ghosts to make them even more interactive! My grandson loved it!


For the next two cards I used my beloved die set from Lawn Fawn - the Magic Picture Changer die set. I still love using this set and I can always find so many different ways to incorporate other stamp sets with it. Gina K's stamps from Haunts and Harvest were used again along with the fence die from Tim Holtz and the grass border die from Lawn Fawn.


The Magic Picture Changer is an interactive set so once you pull up the tabs at the top you get this:


The last card is created using a technique similar to partial die cutting. I created a side opening, landscape card base and after scoring and folding it I cut about 1/3 off of the top front. I then cut out the ghosts again from Haunts and Harvest in white cardstock then used the die to cut the bottom portion of the die from the front of the card base. I layered pieces of patterned paper to the front and inside. The sentiment is heated embossed in white.


I hope that you enjoyed seeing these late but cute Halloween cards! I'll be posting more of my cards and other crafty projects soon and more often. Until next time, Happy Crafting!

LinkWithin