Finally, A Crafty Post! It's been too long!
Another 3-D Lantern
Hello everyone! Sorry I haven’t blogged in a while but today is my day to post over at Cricut FANantics blog and I have decided to show you another 3-D lantern I made from Cricut Exclusives, 3-D Lanterns. I absolutely love making these and they'd also be great for decorating for parties! Can you imagine a bunch of these made in red, white, and blue hanging from the trees in your backyard for next months 4th of July party! That would make a WOW factor for your guests!
After I made the last lantern (which you can see HERE in another post), my little granddaughter wanted one for her room in her favorite color - purple.
Here's what I made for her:
I added a handle made of cardstock and strips of vellum. And of course she had to have bling on it!
I decided to try cutting out the rolled flowers out of vellum instead of cardstock and I really like how they turned out! These flowers were cut out with the Artiste cart at 2.5" and 2". Just remember to change your settings (pressure, blade depth, & speed) on your machine when cutting something as thin as vellum.
She turns on the little light under her lantern every night before going to sleep and thinks about her Grandma! (OK, I just added that last part myself but I'm pretty sure she really does thinks about me every night!)
Thanks for coming by today and please visit again soon! Until next time, Happy Crafting!
Fantabulous Cricut Challenge #157 ~ 3-D Project
Good Monday morning to all my crafty friends! I’m on the Fantabulous Cricut Challenge Blog Design Team and today we are starting a new challenge – create a 3-D project with at least one cut image cut with your Cricut! Well, this challenge was right up my alley. I LOVE creating 3-D items! So I decided to use one of the Cricut Craft Room Exclusives that I bought a while ago when it was on sale but until now I have never used it. I created the Branches Lantern from 3-D Lanterns. If you are just coming from FCCB, then this is the lantern that you saw -
But after living with it for a while, I had to add some more stuff to it! It’s not finished until I say it’s finished and it just was not finished! So here is my new and improved 3-D Lantern -
As you can see I added layered flowers to all of the branches, a handle at the top that is secured with a bundle of beautiful rolled flowers and leaves. But let’s start at the beginning. These lanterns are so easy to put together and make great pieces for your home. If you use flameless candles you can even use these as night lights for little children.
You just need to cut out 4 of the same panel for this lantern and the 4 pieces of vellum for the inside. I cut this lantern out at 11.11”. But I added something a little different – I cut out 4 extra panels in Kraft cardstock to make the branches look a little more realistic.
First I carefully cut out all of the branches from 2 of the pink panels.
Then I cut out the branches from the Kraft cardstock but this time I left a small border around the branches.I only had to cut out 2 sets of branches from each panel of the Kraft. I left them in sets of 2 and 3. I attached a very thin (1/8”) piece of Scor-Tape to the pieces that I cut out but not actually on the branches.
I carefully placed the pink panel directly over the Kraft – hiding the sides and only letting the branches show through.
I then punched out tons of little flowers from different punches in different sizes.
I inked all of the flower edges to give them more depth.
After the flowers were all inked, I used my flower shaping tools from McGill to give all of them even more dimension.
I also added some Martha Stewart Branch Punches in green and Kraft.
Here are the flowers that I put on each side of the lantern top. They were cut with a My Favorite Things die, Embossed with my Cuttlebug, inked and rolled. There are some made from cardstock and a couple made from vellum. I added a clear jewel in the center of each flower. Each butterfly was punched out in white cardstock and stamped with VersaMark ink and heat embossed with detailed embossing powder. I added some bling down the middle of the butterflies. The white on white embossing is so gorgeous – I really wish you could see the detail!
Then I added the tiny layered flowers with clear jewels in the centers to all of the Kraft colored branches.
A handle was added and then I put a votive candle inside and turned off the lights. (I know that a flameless candle is so much better but unfortunately I couldn’t find any and this was just for a quick photo op. Besides I’m still here, but thanks for your concern!)
Isn’t that beautiful?!?!?!? I am really liking these right now and I plan to make more. They’re so quick and easy, even if you makes alterations like I did. Think of the gifts you could create and match these to the recipients home décor! Please comment and let me know what you think! Will you be making some 3-D Lanterns soon? Also, think out of the box – the image that you cut with your Cricut does not need to end up looking like the picture in the handbook – make some changes – make it your own! There is no right or wrong in Art ~ just beauty!
Please visit the other designers at FCCB and see what designs they have come up with. And don’t forget to leave some “Blog Love” for everyone!
Supplies used:
- Cricut Expression
- Assorted cardstock, Vellum
- Punches – Stampin’ Up, Fiskars, EK Success, Martha Stewart, The Paper Studio,
- Die – My Favorite Things
- Ink – VersaMark, Colorbox Chalk
- Stamps – Background stamp by SU, Damask Chair by Stampendous
- Rhinestones – Colorbok, White Blossom
- Adhesive – Scor-Tape, Glossy Accents
Thanks so much for visiting and I hope you enjoyed my project today! Now it’s your turn – go create a 3-D project and link it up at FCCB!
Until next time, Happy Crafting!
Glass Block Tutorial
Hey guys, here is the tutorial for the Glass Block that I first posted on Saturday.
I started with just a clear glass block that I bought at Hobby Lobby. It has an opening in the bottom to place your string of lights. Instead of using my glass etching cream on it like I had originally planned, I decided to spray the entire block with this -
It’s a Specialty Frosted Glass spray made by Rust-oleum that I also purchased at Hobby Lobby. After the glass is sprayed it almost looks like it’s been etched or frosted.
(You can barely see the string of white Christmas lights inside the block in this photo.)
The block will need a couple of coats of spraying but it dries pretty fast. I measured my glass block at about 7.25” square. Now, I use my Gypsy or Design Studio whenever I can because an image that looks square may not always be a perfect square. So with my G or DS I can unlink the height and width proportions to make an image perfectly square. Two things to remember – make sure the little chain link is NOT highlighted yellow on the Gypsy to unlink the height and width proportions and you may also need to use the Real Dial Size to get the correct size. I used an image from the Paper Lace cartridge and sized it to 7.25”x7.25”. I also used pink vinyl and transfer tape, both from Provo Craft.
Using this transfer tape will save you from countless headaches – trust me on this one! I set the pressure on my Cricut to Medium (3) and my blade depth to 2 –remember, I used my Gypsy so I couldn’t control the speed but slow the speed down to 3 also if you’re just using your machine alone. You just want to do a ‘kiss cut’ – cutting only the vinyl and not the paper backing. After you have your vinyl cut out, you need to “weed” it. That just means to pull off all the negative areas of the vinyl and leave the image on the paper backing. The best tool to use is the dental looking tool that comes in the Cricut Tool kit! I love that little thing!It’s probably one of my favorite and most used tools! Now cut a piece of the transfer tape a little bit larger than your image. Pull the transfer tape layers apart – there is the part with the grid on it and a tacky layer. Place the tacky piece over your design. Here is what it will look like with the tacky layer over the design:
Now burnish the tape onto the vinyl image by rubbing it with the stick that came with the vinyl or the transfer tape. You can also use an old credit card or something similar – just make sure that you get a good seal between the vinyl and the tape.
Then gently peel the transfer tape away from the vinyl paper backing. The vinyl image should come up with the transfer tape. If it doesn’t, put the tape back down and burnish it some more.
Place the transfer tape with the vinyl image over your project, in this case, the glass block, making sure that the vinyl image is centered correctly.
Once you have it where you want it, smooth it down so that you seal the vinyl to the glass. Then slowly peel the transfer tape off. Go slow – you want to avoid air bubbles!
If you do find some air bubbles just keep smoothing them out slowly with your finger being careful not to rip the vinyl.
And here is the finished project -
Just add a string of lights and plug it in! What I like about this method of decorating a glass block is that you can easily take the vinyl off and redecorate it with different images and in different colors of vinyl – even use multiple colors of vinyl!
See how nice it looks with the lights plugged in -
I hope that you enjoyed this tutorial. If you have any questions, please email me! Until next time, Happy Crafting!
3-D Haunted House using Happy Hauntings; BBTB2 Challenge
I had wanted to make the creepy haunted house from the Happy Hauntings Cricut cartridge ever since I got it. So when I saw that the house was the blog challenge this week on Bitten by the Bug 2, I jumped at the chance to play along. They said that the cutting was easy – cutting is always easy using my Cricut – but warned that the assembly took time. Boy, were they ever right! There seemed to be hundreds of pieces to this thing and even though the step-by-step instructions are in the back of the handbook, there are 22 steps – and 9 of the steps have 2 parts! You do the math! LOL! But once I started this project I couldn’t stop simply because I couldn’t wait to see what the finished house would look like.
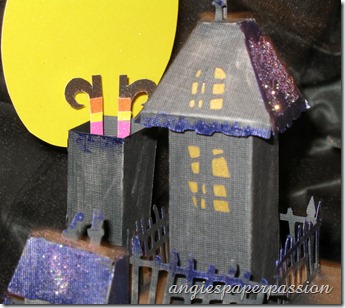
I followed BBTB2 recommendation and cut it out at 7” and when all assembled the finished house is almost a foot tall. I used black cardstock for the whole thing but when it was finished I used a deep purple Twinkling H2O by LuminArte and brushed it onto the roof, balcony, and railings. Finally after buying about 20 jars of this stuff several years ago I actually used some! You can see the Twinkling H2O’s HERE. Then I sprinkled some purple and black Doodlebug brand glitter mixed together on top. Another old purchase! I could have been a little neater with this step but by this time I just wanted to be done! So please excuse the mess. Because I put two electric tea lights inside the house and I wanted the light to shine through, I cut the window parts of the design out of yellow vellum. You can see one through the door…
I used my Gypsy to weld extra fence lengths together and glued them all around a 12x12 piece of black cardstock. After everything was done, I just kept thinking that it needed something else. Surprise, surprise! I couldn’t just stop there! So I came up with the idea of the witches legs and feet sticking out of the chimney. I actually cut this out free-hand using DCWV Midnight Spell Glitter Mat Stack. But because it was a little hard to see the legs, I cut out a circle for a moon to place behind it.
I photographed it with the same spooky tree that I posted a couple of weeks ago. Here is another view of the house…
Although it took some time and there were a lot of pieces to the house, I really did enjoy the outcome. I hope you’ll like it too. At least appreciate it after seeing the next photo of the haunted house in progress, lol…
(And this was after step #13B!)
Head over to Bitten by the Bug 2 and take a look at all of the Haunted Houses created by the wonderfully talented designers over there!
Until next time, Happy Crafting,