My Last Post for Cricut Fanatics ~ A Heritage Layout
Another 3-D Lantern
Hello everyone! Sorry I haven’t blogged in a while but today is my day to post over at Cricut FANantics blog and I have decided to show you another 3-D lantern I made from Cricut Exclusives, 3-D Lanterns. I absolutely love making these and they'd also be great for decorating for parties! Can you imagine a bunch of these made in red, white, and blue hanging from the trees in your backyard for next months 4th of July party! That would make a WOW factor for your guests!
After I made the last lantern (which you can see HERE in another post), my little granddaughter wanted one for her room in her favorite color - purple.
Here's what I made for her:
I added a handle made of cardstock and strips of vellum. And of course she had to have bling on it!
I decided to try cutting out the rolled flowers out of vellum instead of cardstock and I really like how they turned out! These flowers were cut out with the Artiste cart at 2.5" and 2". Just remember to change your settings (pressure, blade depth, & speed) on your machine when cutting something as thin as vellum.
She turns on the little light under her lantern every night before going to sleep and thinks about her Grandma! (OK, I just added that last part myself but I'm pretty sure she really does thinks about me every night!)
Thanks for coming by today and please visit again soon! Until next time, Happy Crafting!
Mother’s Day Card
Hey friends! I hope that everyone is either keeping cool or warm, depending on where you are. Or, if you’re like us in North Texas, you’re keeping warm AND cool!!! In the last week, I’ve gone from the 80’s to the high 30’s and back again! But moving on, I know that Mother’s Day is a month away but because I have a bad habit of procrastinating AND I have been taking care of my 2 month old Grandson, I hardly have time to do much crafting lately. So when I started thinking of Mother’s Day cards, I knew that I need something that was simple but still beautiful and special (my Mom just turned 93!!!). So for these reasons, if I'm going to send any cards out this year, I need to start NOW and make it simple on myself.
So I went to Cricut.com to see what my "simple" options were. I had been looking at the Craft Room Exclusives like the sets of single Mother's Day cards and I found one that I really liked:
So I bought it - cut two pieces - glue!!! Easy peasy! Plus it was 1.99 and now with the sale going on it is 1.69 (If you're a Cricut Circle member, you get an addition 10% off). No need to wait for it to be mailed to you - it will be in your Cricut Craft Room the next time you open it! Again, really simple!
I used paper from K&Company for the card and cut it a 5.5".
I just wanted to show you up close how detailed those cuts are.
All the cuts were nice and smooth for being so detailed.
But I still needed something extra on that card. I thought about it for a long time and finally can up with this (you know how I love my flowers and my bling! LOL!)
And there they are! The flowers were cut on the Cricut with the CTMH Artiste cart at 3.25' and 4'. I used some seam binding that I had hand-dyed myself with Distress Ink in Peeled Paint. Then I added some branches from a Martha Stewart hand punch and the bling is from Colorbok.
A Close Up of my rolled flowers, ribbon, and punched leaves.
Okay, so even though I did add a few things, I think it a perfect card for a special Mom! And they won't take long to make. In the Cricut Craft Room make the card base as many times as you need. The next time that you have a few minutes, cut out the flowers with the Cricut and punch some leaves with a punch (or even make those with the Cricut, too). The roses can be rolled one evening while watching T.V. I use Scotch Quick Drying Adhesive or Glossy Accents and they both work great and they DO DRY FAST! Then all you would need to do is put them all together - assembly line style! In no time at all you will have a stack of cards just waiting to be mailed.
I just wanted to share with you that you can take a simple card from CCR and make it extraordinary all for only a couple of bucks. But they won't look like it!
Thanks for dropping by and until next time, Happy Crafting,
St. Patty’s Day Candy Cracker
It was so easy to cut out and put together. I used the CTMH Artist cartridge for the cracker cutting it out at 9.25”. There is also a cracker image on Tags, Bags, Boxes & More 2. The sentiment was cut from Tags, Bags, Boxes & More 2 at 2”. I would’ve loved using glitter cardstock for the “Good Luck” but I didn’t have the right colors so I used regular cardstock and used Stickles in Platinum and Lagoon to color the images. Before I cut out the cracker, I created a rectangle from CCR Basics and welded it to the cracker in the Cricut Craft Room to create a window in the cracker. After it was cut, I used Scor-Tape (Love this stuff!!!) to adhere a piece of transparency to the inside.
Instead of using ribbon as a closure, I wrapped some gold tinsel that I bought at Michaels last Christmas at each end. (Who knew you could use up your Christmas hoard for other holidays! Yet again, hoarding pays off, lol) It’s filled with lucky gold chocolate coins! Oh yes, it just couldn’t be finished without some green bling!
A Quick Valentine’s Gift!
Here are a couple of quick projects for those last minute Valentine's Day gifts. The first one is a simple note card:
I cut the cardstock at 3x6 to make this into a 3x3 card and added a 3x3 piece of patterned paper to the front. The scalloped border is from my 'old faithful' cart - Plantin Schoolbook! Even with all of the newer carts around this one still is a wonderful cart with so many great images. I cut out about 10 borders in cardstock at 0.5". I also used Accent Essentials to cut out the heart in glitter paper at 2.25". After inking the edges of the scallops, I adhered them to the card by staggering the borders, added a piece of ribbon with glue dots, and the heart with small pop dots. Once finished I decided that it needed one more thing so I punched out a tag shape (Jewelry Tag) and stamped a Valentine's sentiment (Teeny Tiny Wishes) on it and adhered it to the heart with a tiny red brad. Both the the punch and the stamp are made by Stampin’ Up! Then I was satisfied that it was finally finished!
Next is a Tag Treat Holder:
Again, I used Plantin Schoolbook. This image is on page 71 (shift/Italic). It's one of those images that I often don't pay attention to and skip over but it makes a cute little treat holder by scoring it in the middle and folding in half. It was cut at 8" with the Fit to Length feature turned on with my Expression and scored at 3.75" and again at 4.5". I added two little hearts cut with the shift/Tall Ball feature (found on the same page) at 2.5", adhered them on to the tag, and tied it together with some twine. This would be great to give to someone with a piece of chocolate inside (think Ghirardelli chocolate squares! Yum!)
I think I will put both of these little gifts into this gift bag that was made with Plantin Schoolbook (see, I told you it was still a great cart!):
This was cut with the Fit to Page feature turned on. After putting it together with Scor-Tape, I adhered some ribbon and my flower on it. I cut three flowers out at 3” each, the leaves were cut out at 2”. After the flower was cut, I inked all the petals and rolled them towards the back with a paintbrush to give them some dimension. For the brad, I took a plain silver one and applied VersaMark ink to it and then a pink shade of ColorBox ink. I then dipped it into some Iridescent Ice embossing powder by Stampin’ Up! and used my heat gun to melt it on the brad. Instant color change! You can use this little trick to alter any metal brad to suit your needs. Now you don’t have to have every color of brad in your stash! (Or DO you?!?!)
(Click on the photos to enlarge any of the images)
I also just want to say “Thank You” to Carolyn and Gena from The Crafty Scrapper in Waxahachie for inviting me to teach at the shop this past weekend. I had such a wonderful time and I can not wait to go back to teach (and shop) again! My students were the GREATEST and I now have 5 more crafty friends! Thanks to all of you for signing up! If you live in the Dallas/Ft. Worth area (or coming to visit) and have never been to The Crafty Scrapper then get there as fast as you can! They have a wonderful and knowledgeable staff, great classes, and the shop carries everything that you need for scrapping & crafting. It is THE place to go here in North Texas!
Today is also my day as Guest Designer over at Cricut FANatics! Please stop by to leave a comment and to see what the other designers have created!
So whatever you give (and receive) this Thursday, I hope that all of you have a sweet and happy Valentine's Day! Thanks for visiting and until next time, Happy Crafting!
Christmas Reindeer Treat Holders–Cricut FANatics
Hey everyone! It’s my day to post a project on Cricut FANatics and I wanted to share these treat holders with you. They are cute, easy to put together and I’ll show you different ways to use them this Christmas.
I saw something like these several years ago made with punches and I had always wanted to make some but never got around to it. Now that I have my Cricut, I am always trying to make life a little easier by recreating projects from years ago using my Expression along with either my Gypsy or more than ever now with Cricut CraftRoom. For this project I used December 25th cart by Teresa Collins and Cricut Craft Room Basics. I love putting most (if not all) of my cardstock for a project on my cutting mat and making just one pass through my Cricut at one time. So even though there are eight different colors to make a reindeer, I only had to do two passes with my Expression.
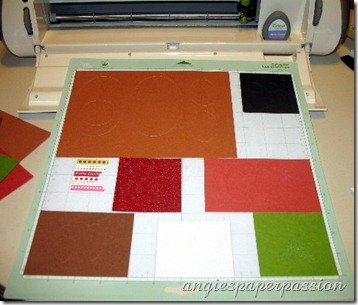
I used the Sweet Treat Cups from Stampin’ Up! for the reindeer noses. You get 12 cups for less than $3!
In one nose I placed red Skittles. You can use Red Hots, red M&M’s, or anything that you’d like to use. In the other nose I used red glitter that I adhered with Glossy Accents and after it dried, I placed oats in the cup. These are to be used on Christmas Eve as “Reindeer Food”. (Note – you may want to use red colored sugar crystals instead of glitter so as not to harm birds or other little critters)
I did the “Reindeer Food” with my kids when they were little and they loved it! There is also a little poem that goes with it that I’ll share at the end of this post. After cutting out all of the parts of the reindeer, I inked all of the edges, added red Stickles to the holly and one of the ornaments, Glossy Accents to another ornament, popped the eyes and eyelids up with pop dots, and added the highlights to the eyes with a white gel pen.
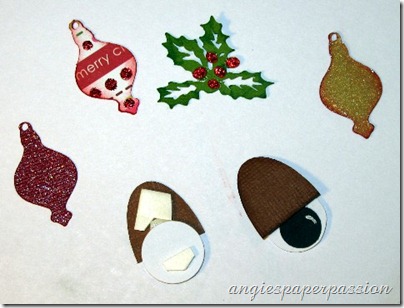
Can you guess what I used for the antlers???
The antlers from the deer on the December 25th cart! I cut out two with one flipped and that gave me two sets of symmetrical antlers. I just cut them off by hand. Everything is then glued to the base (the one without the hole in it) and a piece of ribbon was attached to the tops with my Tiny Attacher (love this tool!).
Then you attach the cup with your treats (or the reindeer’s treats) inside and adhere it to the base. The cups already come with adhesive on them. Next, just place the face on top, attach the eyes and holly, and draw his mouth (I can not draw so excuse his lopsided mouth!).
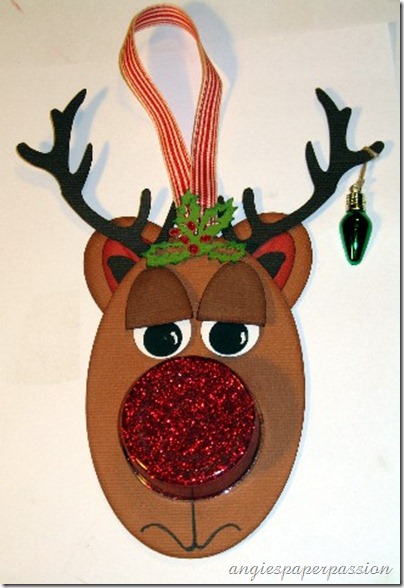
After I put them all together, I found these plastic Christmas lights in my stash and used these instead of the ornaments that I had cut out. I just tied them on with some SU twine.
Here is the poem that I will use (these are not mine, I have just been using them for many years so I do not know where I found them):
Magic Reindeer Food -
Sprinkle this reindeer food outside on Christmas Eve night
The moon will make it sparkle bright
As Santa’s reindeer fly and roam
This magical food will guide them to your home.
Or I may even use one of these:
I wanted the perfect gift for you-
But couldn’t decide just what to do.
I almost sent you a dozen roses-
Instead here’s a bag of…
reindeer noses!
I woke up with such a scare when I heard Santa call...
"Now dash away, dash away, dash away all!"
I ran to the lawn, and in the snowy white drifts,
those nasty reindeer had left "little gifts".
I got an old shovel and started to scoop
Neat little piles of "reindeer poop."
but to throw them away seemed such a waste,
So I saved them, thinking you might like a taste!
As I finished my task, which took quite a while,
Old Santa passed by and he sheepishly smiled.
And I heard him exclaim as he rose to the sky~~~
"Well, they're not potty trained, but at least they can fly!"
Thank you for visiting and I hope that you enjoyed my Christmas Reindeer!
Christmas Reindeer Recipe:
From December 25th -
Holly @ 1.222
Ornament @ 1.431
Antlers – Deer @ 4.417 x 8.583
From Cricut Craft Room Basics -
Circles – 1 @ 4.25 x 2.75 (base)
1 @ 4.25 x 2.75 (with a 1.75 x 1.75 circle welded inside for the face)
2 @ 1.75 x .875 (eyelids)
2 @ 2 x 1.375 (outside ears)
2 @ 1.75 x .875 (inside ears)
2 @ .5 x .5 (eyes in black)
2 @ .75 x .75 (eyes in white)
Until next time, Happy Crafting,
Vivi’s Vacation Mini Album~Cricut FANatics Blog
I just used some cardstock and cruise themed patterned paper that I had on hand and some glittered cardstock to create my mini album along with some ribbons, brads, inks and pop dots. To make the embellishments, I used a variety of Cricut cartridges including Life’s A Beach, Pack Your Bags, Traveler, Ole and Destinations. There were just so many cute cuts to use for a cruise vacation!
This mini album has a front and back cover, a piece for the binding, 10 pages in graduated sizes, and 3 pocket or envelope pages. And although I didn’t use all of the pages, it still is a nice sized mini with plenty of room for pictures, journaling, and extras. A couple of the pages were a little small so I cut two each of the smaller pages and adhered them together to make pockets for larger tags.
Here are the cut sizes:
Mini Books – mini album on page 14 cut at 5”
Life’s A Beach – coral @ 5”, seaweed @ 4.5”, hibiscus @ 3.75”, shells @ 4”, wave border stretched to 6.78” x 1.46” in CCR
Pack Your Bags – ship @ 4”
Destinations – Mexico tag @ 3.5”
Ole – maracas @ 2.5”
Traveler – wave @ 5.5'” x 2” (in CCR), sunglasses @ 2.8”, ‘Adventure’ @ 1.8”, ‘Memories’ @ 2”, ‘Vacation’ @ 1.7” (parts of this were cut off by hand), name @ 1” (Font 1 Shadow)
Please leave a comment and let me know what you think of the mini album! I enjoy all of your “Blog Love” that you leave! Thank you.
Until next time, Happy Crafting,

Are you a fanatic? A Cricut FANatic?
The definition of a Fanatic -
noun – a person with an extreme and uncritical enthusiasm or zeal
Does this sound like anyone you know? wow! listen to all the, ME! ME! ME! Well, then you are in for a treat! The new blog, Cricut FANantics, debuts tomorrow, September 1st! I am proud to announce that I am one of the Cricut FANatic designers and I will post a new Cricut project on the blog each month. It is a great honor because there are so many talented designers that will bring you Cricut inspiration each and every day of the month. Not only will there be projects each day but there will also be Cricut Crafty Challenges and Cricut Sketch Challenges every month. Click this link to head over to the blog and be sure to become a follower.
Until next time, Happy Crafting