Showing posts with label Halloween. Show all posts

Halloween Cards


Yes, I know, Halloween is over but I'd still like to share the cards that I made for my and my friends grandchildren this year. 

For this first card I used Gina K. Designs Haunts and Harvest stamp set for the trio of ghost and the sentiment and used the coordinating die set to die cut the ghosts. Gina's inks were used with her Fizzy stencil to create the orange and purple background and I then cut it out with the Master Layouts 1 Die Cut set along with a piece of black cardstock. I layered those two onto a tent fold 5 1/2" x 4 1/4" base. 


To add a demential element, I glued googly eyes to the ghosts with Gina K Connect Glue.


Did you really think that I could stop there? Of course not! I had to add an Action Wobble behind the three ghosts to make them even more interactive! My grandson loved it!


For the next two cards I used my beloved die set from Lawn Fawn - the Magic Picture Changer die set. I still love using this set and I can always find so many different ways to incorporate other stamp sets with it. Gina K's stamps from Haunts and Harvest were used again along with the fence die from Tim Holtz and the grass border die from Lawn Fawn.


The Magic Picture Changer is an interactive set so once you pull up the tabs at the top you get this:


The last card is created using a technique similar to partial die cutting. I created a side opening, landscape card base and after scoring and folding it I cut about 1/3 off of the top front. I then cut out the ghosts again from Haunts and Harvest in white cardstock then used the die to cut the bottom portion of the die from the front of the card base. I layered pieces of patterned paper to the front and inside. The sentiment is heated embossed in white.


I hope that you enjoyed seeing these late but cute Halloween cards! I'll be posting more of my cards and other crafty projects soon and more often. Until next time, Happy Crafting!


Happy Halloween!

I just wanted to wish you all a very Happy and Safe Halloween! It warmed up here in Texas for the little Trick-or-Treaters to go out tonight and show off their costumes and pick up some treats along the way. I have just one more Halloween project to share before I put it all away and start working on Christmas projects! Here is my Spooky Halloween Banner!

Spooky Banner Medium Web view

I used Pretty Pennants to cut out the banner shapes at 6”. There are 5 shapes in all – the scalloped and regular banner shapes, the half circle shapes at the top, the spider webs, and the two bat flourishes at each end. I love this cart because it can be used for so many occasions and holidays.

Banner Ends

Here is the first and last piece of the banner.

Web

And here is one of the spider webs. I used a little silver ink to dust across the bat flourishes and the webs. Don’t you just love that purple ribbon with the black tinsel trim? It’s great for Halloween projects! It’s the Celebrate It! brand by Michaels.

Background 1

Background 2

I used two different patterned papers as the backgrounds for the banner. Both are made by The Paper Studio. The letters were all cut from the Happy Hauntings cart and were cut at 3.5”. The top layer is cut from a beautiful glitter cardstock called Red Carpet by Core’dinations. LOVE this cardstock!

Side View

Besides my love of bling, I also love dimension! I popped up these letters once into their shadows and then popped them up with not one but with two more pop dots onto the banner! Some people have their weaknesses – mine is pop dots!

Spooky Banner

Well, my banner is up and the candy is sitting in the Halloween bowls so I guess that means that I’m ready for tonight! Hope you are too! Thank you for visiting me today!

One more thing. If you love sales and Cricut images then run, do not walk, to Cricut.com! All of their digital images (carts, single images, image sets, and all Cricut CraftRoom Exclusives) are 31% off! But the sale ends today. If you have any questions about the digital images please leave me a comment!

Until next time, Happy Crafting!

Signature

Halloween Treat Box

I want to share a Halloween treat box that I designed in the Cricut Design Studio some time ago. This was before the CraftRoom and all of the wonderful cartridges that we have now with the boxes and bags. I used square, rectangle, and tag shapes from Plantin School cartridge to create this treat box that you can use for many, many more occasions other than Halloween. These would be cute for other holidays, birthdays, showers, and wedding favors just by changing the colors and adding an different topper. Oh, and of course, changing the treats inside! I will post the CDS file on my blog for anyone who’d like it.
Candy Box5

Candy Box6(Don’t you just LOVE the purple M&M’s?)
Candy Box4This is the box after it is cut with the Cricut.

Candy Box3Now just score! Starting from the left (the side with the window) score at 1”, 3”, 4”, 6”, 7”  and 9”. Turn 90 degrees and score at 1” and 3”. (This cut was embossed with the Big Shot)
CandyBox2Place Scor-Tape on the ends on the 4 tabs.
CandyBox1Cut or punch out a square piece of transparency paper that is slightly larger than the window opening. I used a 1 3/4” punch. Use the Scor-Tape to adhere the transparency to the underside of the window opening.
CandyBox3 (I tried to take a photo of the top to get the transparency but I can’t tell if you can see it or not)
CandyBox4Put it all together and you have a treat box!
CandyBox8Do not adhere the back flap. This is where you will add your treats!
CandyBox5Decorate the top….
CandyBox6and the inside and you’re done! I used Chic & Scary for the spider web on this one and I used Happy Hauntings for the tombstones in the first photo.

Here’s the link to download the Candy Box CDS file - Candy Box - CDS
I will be recreating the Treat Box in the Craftroom and will post the CCR file tomorrow!

Thank you visiting and I hope that you enjoyed today’s Treat Box! Have a safe and Happy Halloween!
Until next time, Happy Crafting,
Signature
Cricut Info & Supplies Used:
Designed by: Angela Cromwell
Cartridges Used: Plantin SchoolBook, Happy Hauntings, Chic & Scary
Cricut Machines Used: Cricut Expression, Cricut Design Studio
Other Supplies Used: K&Co. cardstock, Sixxiz Big Shot, Tim Holtz Tattered Banners Die, gemstones, Scor-Tape, pop dots, transparency sheet, square punch, ink, stamp by Stampin’ Up, PC embossing folder, Scor-Pal

Falling for Halloween Blog Hop ~ Day 2

First I’d like to thank Maria for hosting this incredible Blog Hop this weekend and to also thank her for letting me participate in it. I’ve had a wonderful time and I hope that you have too.

Remember, you should have arrived here from Khrista’s blog. If not, you missed the beginning of the hop, so please go to Maria's blog to start so you don't miss any of the projects. I will also be picking one lucky visitor on Monday to receive a box of Blog Candy so be sure to leave comments on both days of the hop and become a follower! Now on to today’s projects!

I guess I wasn’t quite ready to put the vinyl away since I used it here in my first project. You gotta admit, this stuff is so addicting! Here is my Bewitching charger plate:

BewitchingVinylPlate

I bought the charger plate at Michaels with the bling already on it. I got it at a steal since it had some scratches on it – perfect for a Halloween craft project! For my image, I used the Cricut cartridges A Frightful Affair and Chic and Scary by Teresa Collins. I used the Cricut CraftRoom and my Expression to cut the witch from orange vinyl at 8” and the word ‘bewitching’  from iridescent vinyl at 1 1/2”.

BewitchingVinylPlate2 I tried to take a photo from a different angle so you could see how beautiful this vinyl really is – but unfortunately I failed! But you can see that I blinged her up a little by placing rhinestones on her hat and shoes. After all, we all like bling – even the little witch in us, lol!

Next I made a Halloween Treat Milk box. These would be so cute to hand out to those special little ghosts and goblins that knock on your door this Halloween.

A2

I used CTMH’s Artist cartridge and cut it out at 8” using paper from DCWV (Midnight Spell pad). The nice thing about this cart is that there is an extra handbook that comes with it with assembly instructions. After I adhered it together, I inked all of the edges with Tim Holtz Distress Ink in Spiced Marmalade. I inked a piece of patterned paper from The Paper Studio and wrapped it around the box, added some rhinestones,

A5

and the potion bottles that were cut from A Frightful Affair at 3”. The “liquid” in the potion bottles and the skull and crossbones were cut from glitter cardstock. I used pop-dots to give the bottles some dimension and added more bling.

A4

The potion bottles cut is actually one piece that I cut into two separate pieces and placed on each side of the box. Just because a cut is a certain way in the handbook doesn’t mean that it has to end up on your project that way!

A1

Before and after

A2

The Happy Halloween is stamped with a Stampin’ Up stamp onto a Tim Holtz Sizzix die cut called Tattered Banners which I distressed with Distress Ink and Glimmer Mist then adhered with pop dots. I also used the mist and some Distressed Stains on some white seam binding to change the color of it. The flowers were punched out and also distressed and misted then adhered with glue dots and I placed a rhinestone in the center. Can you tell that I’m also addicted to distressing stuff? (Sorry, the ribbon looks washed out in the photo but looks much better IRL!)

A7

But the following is still one of my favorite projects that I made last year – my little mummy and his tomb cut from the Happy Hauntings cart! Can you tell what the mummy is?

A8

It’s a mini candy bar wrapped up in some plain white gauze with a couple of googly eyes attached!

A9

Thanks so much for joining in on the hop today. Please be sure to check out all the participant's wonderful projects. I've posted the list below in case you've missed anyone. The next blog you will be visiting belongs to the very talented Nadia at http://www.withglitteringeyes.com/. Enjoy!

Maria @  stampcutcreate.blogspot.com

Michele @   scrap-n-dance.blogspot.com

Paulette @  http://scrapalette.blogspot.com/

Cindy @  http://www.inlovewithpaper.blogspot.com/

Beth @  http://seaswancreations.blogspot.com/

Renee @   icameisawicreated.blogspot.com

Debbie @ www.debseclecticthoughts.blogspot.com

Khrista @ http://creativeandcraftyteacher.blogspot.com/

Angela @ Angie's Paper Passion YOU ARE HERE!

Nadia @  http://www.withglitteringeyes.com/ 

Donna @  http://CarolinasCreativeCropper.blogspot.com/

Diane @ http://dianesdribble.blogspot.com/

Sara @  http://www.sarawandrews.com/

Michele @ www.michelegreen.com

Please come by again because I have more projects to keep you crafting!

Until next time, Happy Crafting,

Signature

Falling for Halloween Blog Hop

fallbloghop

There’s a chill in the air so that means Fall has arrived! Well, ok, it’s not that chilly here in Texas but I am still excited about the Fall season! So welcome to the Falling for Halloween Blog Hop where we will be enjoying all the wonderful crafty inspiration for the Fall and Halloween season.
You should have arrived here from Khrista’s blog. If not, you missed the beginning of the hop, so please go to Maria's blog to start so you don't miss any of the projects.
Here at My Paper Passion I will be giving away some Blog Candy to one lucky visitor! All you will need to do is visit here during the weekend Blog Hop and leave a comment on both days and become a follower. I will then enter your name into the drawing and pick a winner next week. 

So here is my first project (yes, there are two projects today! I made more than one and I just couldn’t decide which to post so you are getting to see both!)

I love Halloween! I love to decorate my home with little ghosts and witches. And I also love working and decorating with vinyl. So for this project I mixed these two loves together and came up with this:

Glass BlockVinyl

I used a glass block that I purchased from Hobby Lobby and sprayed it with a Specialty Frosted Glass spray made by Rust-oleum.

Glass Block

To see my original post about how I used the frosted spray, please go HERE. Then I used the new Cricut cartridge A Frightful Affair. This is a fabulous cartridge! I cut out the image from page 45 using the Silhouette feature in black vinyl. Since this image is not square, I used the Cricut CraftRoom to size it to 7.25x7.25 using Real Dial size and cut out the vinyl using a “kiss cut” – that means that you are just cutting the vinyl and not the vinyl backing. My Cricut Expression was set at Pressure - medium and Blade - 2.

VinylGlassBlock

After cutting the vinyl and adhering it to the glass block, I inserted two strands of Halloween lights that I purchased at Michaels – one orange and one purple. This looks great with the room lights off.

Glass Block in Dark

So since I had my vinyl out I just had to make something else. So I cut out this for my living room wall:

ThankfulVinyl

For this project, I used two different Cricut cartridges – the new one by Teresa Collins, December 25th, and Songbird. The original image, from December 25th, for the decorative parts of this wall art has the word ‘December’ in the middle so I used the Hide Contour feature in Cricut CraftRoom to hide it. Then I used Songbird to spell out the word ‘Thankful’. Can you see how versatile these Cricut cartridges can be? You can take a Christmas cartridge and use it for any occasion! So go through your cartridges and see what you can come up with! 

Thanks so much for joining in on the hop today. Please be sure to check out all the participant's wonderful projects. I've posted the list below in case you've missed anyone. The next blog you will be visiting belongs to the very talented Nadia at http://www.withglitteringeyes.com/. Enjoy!

Maria @  stampcutcreate.blogspot.com

Michele @   scrap-n-dance.blogspot.com

Paulette @  http://scrapalette.blogspot.com/

Cindy @  http://www.inlovewithpaper.blogspot.com/

Beth @  http://seaswancreations.blogspot.com/

Renee @   icameisawicreated.blogspot.com

Debbie @ www.debseclecticthoughts.blogspot.com

Khrista @ http://creativeandcraftyteacher.blogspot.com/

Angela @ Angie's Paper Passion YOU ARE HERE!

Nadia @  http://www.withglitteringeyes.com/ 

Donna @  http://CarolinasCreativeCropper.blogspot.com/

Diane @ http://dianesdribble.blogspot.com/

Sara @  http://www.sarawandrews.com/

Michele @ www.michelegreen.com

Please come back tomorrow to see what else I have created for the Blog Hop. Until then, Happy Crafting,

Signature

3-D Haunted House using Happy Hauntings; BBTB2 Challenge

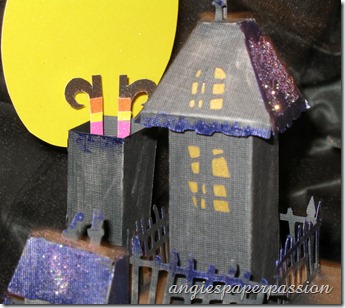
I had wanted to make the creepy haunted house from the Happy Hauntings Cricut cartridge ever since I got it. So when I saw that the house was the blog challenge this week on Bitten by the Bug 2, I jumped at the chance to play along. They said that the cutting was easy – cutting is always easy using my Cricut – but warned that the assembly took time. Boy, were they ever right! There seemed to be hundreds of pieces to this thing and even though the step-by-step instructions are in the back of the handbook, there are 22 steps – and 9 of the steps have 2 parts! You do the math! LOL! But once I started this project I couldn’t stop simply because I couldn’t wait to see what the finished house would look like.

Haunted House2

I followed BBTB2 recommendation and cut it out at 7” and when all assembled the finished house is almost a foot tall. I used black cardstock for the whole thing but when it was finished I used a deep purple Twinkling H2O by LuminArte and brushed it onto the roof, balcony, and railings. Finally after buying about 20 jars of this stuff several years ago I actually used some! You can see the Twinkling H2O’s HERE. Then I sprinkled some purple and black Doodlebug brand glitter mixed together on top. Another old purchase! I could have been a little neater with this step but by this time I just wanted to be done! So please excuse the mess. Because I put two electric tea lights inside the house and I wanted the light to shine through, I cut the window parts of the design out of yellow vellum. You can see one through the door…

Haunted House4

I used my Gypsy to weld extra fence lengths together and glued them all around a 12x12 piece of black cardstock. After everything was done, I just kept thinking that it needed something else. Surprise, surprise! I couldn’t just stop there! So I came up with the idea of the witches legs and feet sticking out of the chimney. I actually cut this out free-hand using DCWV Midnight Spell Glitter Mat Stack. But because it was a little hard to see the legs, I cut out a circle for a moon to place behind it.

Haunted House3

I photographed it with the same spooky tree that I posted a couple of weeks ago. Here is another view of the house…

Haunted House7

Although it took some time and there were a lot of pieces to the house, I really did enjoy the outcome. I hope you’ll like it too. At least appreciate it after seeing the next photo of the haunted house in progress, lol…

Haunted House1 (And this was after step #13B!)

Head over to Bitten by the Bug 2 and take a look at all of the Haunted Houses created by the wonderfully talented designers over there!

Until next time, Happy Crafting,

Signature

LinkWithin