Showing posts with label Cricut. Show all posts

Thank You Card - Mod Squad Challenge with Kitchen Sink Stamps

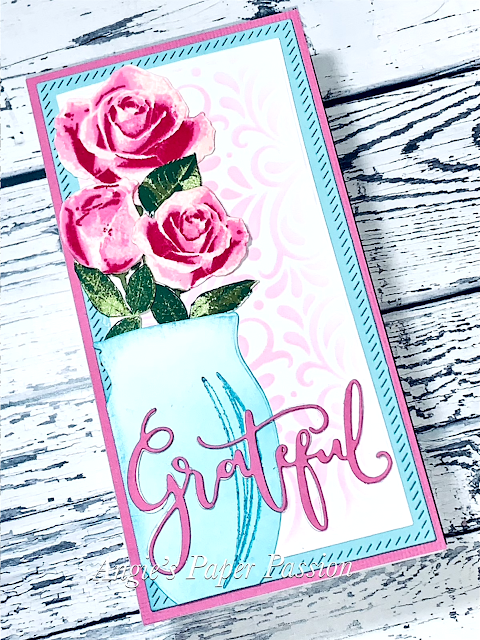
 Hello Crafters! I have created a Mini Slimline Thank You card for Maria Colosimo of Kitchen Sink Stamps. She has the most beautiful stamp sets that I've ever seen! They make very detailed and realistic images. The Modsquad Challenge is to create a Thank You card for Maria using Kitchen Sink Stamps.

I used the very first stamp set that I ever purchased from Kitchen Sink - Hearts & Roses. To create each rose and leaf image there are three to four stamps that you just layer with coordinating ink colors to achieve the intricate and detailed final images. All of her stamps are so detailed and fun to create.

I started with the flowers and used inks from Gina K Designs and Pinkfresh Studio from the palest pink to a really pigmented pink to achieve the look of the roses pictured. This set does not have a die set to match but Kitchen Sink Stamps offers an SVG file with their sets. I can use that SVG file on my Cricut Maker or Explore to cut out all of the images (and as many as I want). After I cut the images with my Cricut I just stamp the cut outs. 

I die cut the white and teal cardstock with the Pinkfresh Studio Mini Slimline Die Cut Bundle. Then I used the Harvest Stencil from Gina K Designs and a pink ink to create a soft background. I die cut the vase from GKD Fearless Joy stamp & Die set to place my roses in and inked it in a teal color.

The 'Grateful' sentiment is a GKD die from the new Fluttering Fall Bundle.

While I was stamping these beautiful roses I decided to grab more coordinating ink colors and made many more roses in different colors for future projects. They are so addicting to make!

Well, I hope that you enjoyed seeing my Thank You card for Maria! I hope she enjoys it also! Hop on over to the Modsquad Challenge Blog and play along!

Thank you for dropping by! Until next time, Happy Crafting!

 I'm actually posting again! So excited to share again. This is just a quick post to share a project that I made for my sister-in-law. The photo is one of her favorites of her granddaughter - my great niece - Bel. Since it was a favorite I wanted to frame it and make it special. Bel's look of happiness and joy deserves something more than an ordinary and plain frame. This photo deserves something as special as she is!
 I just bought an inexpensive frame and used my Cricut Explore to decorate it with the Cricut Cartridge 3-D Floral Home Decor. This image was so much easier to make than it looked like in the handbook and I loved how it turned out. I added a little ink to the leaves and some Wink of Stella to the roses. I just adhered the two pieces of the image to the corners of the frame with E6000. Now it's ready to be all wrapped up.

Thanks for stopping by 
And Happy Crafting,
Angela

Happy Halloween!

I just wanted to wish you all a very Happy and Safe Halloween! It warmed up here in Texas for the little Trick-or-Treaters to go out tonight and show off their costumes and pick up some treats along the way. I have just one more Halloween project to share before I put it all away and start working on Christmas projects! Here is my Spooky Halloween Banner!

Spooky Banner Medium Web view

I used Pretty Pennants to cut out the banner shapes at 6”. There are 5 shapes in all – the scalloped and regular banner shapes, the half circle shapes at the top, the spider webs, and the two bat flourishes at each end. I love this cart because it can be used for so many occasions and holidays.

Banner Ends

Here is the first and last piece of the banner.

Web

And here is one of the spider webs. I used a little silver ink to dust across the bat flourishes and the webs. Don’t you just love that purple ribbon with the black tinsel trim? It’s great for Halloween projects! It’s the Celebrate It! brand by Michaels.

Background 1

Background 2

I used two different patterned papers as the backgrounds for the banner. Both are made by The Paper Studio. The letters were all cut from the Happy Hauntings cart and were cut at 3.5”. The top layer is cut from a beautiful glitter cardstock called Red Carpet by Core’dinations. LOVE this cardstock!

Side View

Besides my love of bling, I also love dimension! I popped up these letters once into their shadows and then popped them up with not one but with two more pop dots onto the banner! Some people have their weaknesses – mine is pop dots!

Spooky Banner

Well, my banner is up and the candy is sitting in the Halloween bowls so I guess that means that I’m ready for tonight! Hope you are too! Thank you for visiting me today!

One more thing. If you love sales and Cricut images then run, do not walk, to Cricut.com! All of their digital images (carts, single images, image sets, and all Cricut CraftRoom Exclusives) are 31% off! But the sale ends today. If you have any questions about the digital images please leave me a comment!

Until next time, Happy Crafting!

Signature

Falling for Halloween Blog Hop

fallbloghop

There’s a chill in the air so that means Fall has arrived! Well, ok, it’s not that chilly here in Texas but I am still excited about the Fall season! So welcome to the Falling for Halloween Blog Hop where we will be enjoying all the wonderful crafty inspiration for the Fall and Halloween season.
You should have arrived here from Khrista’s blog. If not, you missed the beginning of the hop, so please go to Maria's blog to start so you don't miss any of the projects.
Here at My Paper Passion I will be giving away some Blog Candy to one lucky visitor! All you will need to do is visit here during the weekend Blog Hop and leave a comment on both days and become a follower. I will then enter your name into the drawing and pick a winner next week. 

So here is my first project (yes, there are two projects today! I made more than one and I just couldn’t decide which to post so you are getting to see both!)

I love Halloween! I love to decorate my home with little ghosts and witches. And I also love working and decorating with vinyl. So for this project I mixed these two loves together and came up with this:

Glass BlockVinyl

I used a glass block that I purchased from Hobby Lobby and sprayed it with a Specialty Frosted Glass spray made by Rust-oleum.

Glass Block

To see my original post about how I used the frosted spray, please go HERE. Then I used the new Cricut cartridge A Frightful Affair. This is a fabulous cartridge! I cut out the image from page 45 using the Silhouette feature in black vinyl. Since this image is not square, I used the Cricut CraftRoom to size it to 7.25x7.25 using Real Dial size and cut out the vinyl using a “kiss cut” – that means that you are just cutting the vinyl and not the vinyl backing. My Cricut Expression was set at Pressure - medium and Blade - 2.

VinylGlassBlock

After cutting the vinyl and adhering it to the glass block, I inserted two strands of Halloween lights that I purchased at Michaels – one orange and one purple. This looks great with the room lights off.

Glass Block in Dark

So since I had my vinyl out I just had to make something else. So I cut out this for my living room wall:

ThankfulVinyl

For this project, I used two different Cricut cartridges – the new one by Teresa Collins, December 25th, and Songbird. The original image, from December 25th, for the decorative parts of this wall art has the word ‘December’ in the middle so I used the Hide Contour feature in Cricut CraftRoom to hide it. Then I used Songbird to spell out the word ‘Thankful’. Can you see how versatile these Cricut cartridges can be? You can take a Christmas cartridge and use it for any occasion! So go through your cartridges and see what you can come up with! 

Thanks so much for joining in on the hop today. Please be sure to check out all the participant's wonderful projects. I've posted the list below in case you've missed anyone. The next blog you will be visiting belongs to the very talented Nadia at http://www.withglitteringeyes.com/. Enjoy!

Maria @  stampcutcreate.blogspot.com

Michele @   scrap-n-dance.blogspot.com

Paulette @  http://scrapalette.blogspot.com/

Cindy @  http://www.inlovewithpaper.blogspot.com/

Beth @  http://seaswancreations.blogspot.com/

Renee @   icameisawicreated.blogspot.com

Debbie @ www.debseclecticthoughts.blogspot.com

Khrista @ http://creativeandcraftyteacher.blogspot.com/

Angela @ Angie's Paper Passion YOU ARE HERE!

Nadia @  http://www.withglitteringeyes.com/ 

Donna @  http://CarolinasCreativeCropper.blogspot.com/

Diane @ http://dianesdribble.blogspot.com/

Sara @  http://www.sarawandrews.com/

Michele @ www.michelegreen.com

Please come back tomorrow to see what else I have created for the Blog Hop. Until then, Happy Crafting,

Signature

Are you a fanatic? A Cricut FANatic?

The definition of a Fanatic -

noun – a person with an extreme and uncritical enthusiasm or zeal

Does this sound like anyone you know? wow! listen to all the, ME! ME! ME!  Well, then you are in for a treat! The new blog, Cricut FANantics, debuts tomorrow, September 1st! I am proud to announce that I am one of the Cricut FANatic designers and I will post a new Cricut project on the blog each month. It is a great honor because there are so many talented designers that will bring you Cricut inspiration each and every day of the month. Not only will there be projects each day but there will also be Cricut Crafty Challenges and Cricut Sketch Challenges every month. Click this link to head over to the blog and be sure to become a follower.

cricutfanbutton1

Until next time, Happy Crafting

Signature

Cricut Circle Stick Pin Swap

Hey friends! When I joined the Cricut Circle there was a stick pin swap already in progress but I loved reading the swap thread even though I wasn’t a part of the group. The posts on this thread were so entertaining and I could just tell that this group of women were a lot of fun. I posted that I was just having a ball reading their posts everyday and that I would like to try making some of the stick pins just for myself since I still had a lot of beads left over from my jewelry making days. To my amazement, a couple of the ladies agreed to do a one-on-one swap with me! Ohhh, how sweet (thanks jjewel and scrapcat). So I got to work on my pins – well, after a little retail therapy! Yes, I had to go buy a few, well okay, a little more than a few (and that’s all that I will admit to) more beads! Then towards the end of the swap, someone dropped out and they asked if I could be they’re Angel. They must have noticed the halo in my avatar – and they didn’t even mind if it was a little crooked, lol! So I ended up making enough stick pins for everyone in the group – two each. That’s a grand total of 38 stick pins! I even made a tag for each set although mine were nothing like the ones I received back. Those ladies aren’t just nice, they are all so talented! These are now my Circle sisters and some have become good friends.

Today I will share some of the stick pins that I made and later on I will share all of the gorgeous pins that I got in return. (I still haven’t taken any photos of them yet. I was so amazed when I opened the box, all I have been able to do is lay them all out and ohhh and ahhh over them!) Now, for those who are not sure what stick pins are, think about the old hat pins but on a smaller scale. They are very popular in scrapbooking and card making right now.

Stick Pins 1

Stick Pins 2

Stick Pins 3

Stick Pins 4

And here are two sets that I had already packaged with their tags:

Stick Pins 5

Stick Pins 6

I cut these cute little Bug Heads with my Cricut, of course!

Stick Pins 7

The stick pins were so much fun to make and my Circle swap group is the greatest! I had so much fun, in fact, that I signed up with this group to swap again. This time? Yep, more beads! We are swapping beaded tendrils to make bracelets in one group and the other group is for the “die hard crafter” and we can make anything we want to as long as it has beads. I foresee another round of retail therapy in my near future…

Until next time, Happy Crafting,

Signature

Origami Folded Mini Album

This is the Origami Mini Album that I posted on my blog last month but I didn’t give any details about it. So I finally did this tutorial for you – just a little late but I hope that you enjoy it! These are really easy to make and they make very nice gifts. I made several as little Mother’s Day gifts for friends a few years ago.

Origami Album

You’ll need:

  • Two pieces of chipboard – 4”x4” each
  • Four pieces of patterned paper – two @ 4.5”x4.5” (the floral paper in my photos) for the mini album covers and two @ 3 7/8” x3 7/8”  (the green) for the inside covers. I used double-sided paper from the Sweet Nectar stack by K&Company
  • Wide ribbon – about 2 feet. I just used some wired ribbon from my stash
  • Three pieces of cardstock – 8”x8”
  • Strong adhesive – I used my trusty ATG!
  • Any embellishments of your choice for your pages – Used my Cricut of course!

Origami Album  (1)

ok. let’s start! Put your adhesive on one side of both pieces of your chipboard. Place these, adhesive side down, centered on the 4.5x4.5 pieces of the patterned paper like the example on the right side in the following photo.

Origami Album  (2)

Cut the corners off of the patterned paper almost to the tip of the corner of the chipboard. (Don’t cut the patterned paper all the way to the corner of the chipboard!)

Origami Album  (2)

Now put adhesive on each of the four sides of the patterned paper ‘tabs’ that you just created and then fold them over onto the chipboard. This makes really nice mitered corners.

Origami Album  (3)

Now take the smaller two pieces of patterned paper (the 3 7/8” by 3 7/8” squares) and place adhesive on them making sure that they get a good coverage of adhesive, especially on the edges, corners, and center. You are going to have to use your imagination for this part! I forgot to take that photo and didn’t realize until now – after the album is glued together!                         Sorry!Embarrassed smile

You have just created the covers for your mini album! Now on to the inside and the ‘origami’ folding using the three pieces of cardstock. I did take photos of this part – I promise. This part uses just 3 folds per piece! I used a scoring board to make the folding easier. Trust me, it really does help to have one of these!  I actually have two – the Scor-Pal and the one by Martha Stewart shown in the photos. A bone folding tool also helps by making your folds nice and crisp!

Origami Album  (29)

First, score and fold the first piece of cardstock in half diagonally…

Origami Album  (30)

and use your bone folder to crease.

Origami Album  (31)

Open the folded cardstock, and turn it over and make the next two folds in the opposite direction. (This will make sense in a minute). Now fold in half from side to side like this:

Origami Album  (32)

Now unfold and fold again in half from top to bottom.              Unfold again.                                                                                                           

Now when you press the two opposite creased corners in towards the center…

Origami Album  (33)

the other two corners will automatically collapse together…

Origami Album  (8)

Don’t forget to use your bone folder on all folds!

Origami Album  (35)

Repeat these steps with the other two pieces of cardstock. You are now going to adhere the three pieces together. Put adhesive on one of the folded pieces (again making sure to put adhesive close to all edges, corners, and good amount in the middle – you don’t want your mini to fall apart when it is opened!) and adhere two together with the ‘openings’ facing in opposite directions…

Origami Album  (36)

Adhere the third piece next with its ‘opening’ going in the same direction as the first, or bottom, piece of cardstock. I hope this all makes sense, lol! Your three pieces should look like this:

Origami Album  (40)

Origami Album  (41)

Now, let’s put it all together! With the inside pages all folded, put adhesive on one side (again, don’t skimp on the adhesive!)…

Origami Album  (43)

and place one of the covers on top, eyeballing the placement and making sure that the cover is centered on the ‘pages’…

Origami Album  (44)

Turn your album over and repeat, adhering the second cover. When you open your mini album, it will look like this…

Origami Album  (45)

and this…

Origami Album  (46)

You now have six 4”x4” square pages to place photos or journaling – four on one side and two on the other side when you turn the album around. There are also 12 squares that are folded in half giving you 24 triangles to embellish! Those triangles are great for journaling! For the closure, I used my wired ribbon to wrap around the mini and tied it into a bow. I love the wired ribbon because it holds its shape. This way you can just slip the ribbon off the mini without having to untie it! I used the Paper Lace cartridge, my Expression, and Gypsy to cut out the same image that I used on the front of my glass block in a previous post and just cut two in a smaller size and adhered them to a couple of the inside pages. I plan on embellishing the inside some more before I give it as a gift!

Origami Album  (12)

Here is my final mini album -

Origami Album  (49)

I can’t seem to stop making paper flowers lately! So I just had to make another one of my 8-layered flowers, with some bling added, and adhere it to the ribbon:

Origami Album  (53)

I hope that you give this a try enjoy creating your own Origami Mini Albums! If you have any questions please email me. Thanks for visiting!

Until next time, Happy Crafting,

Signature

LinkWithin