Showing posts with label Stencil. Show all posts

Thank You Card - Mod Squad Challenge with Kitchen Sink Stamps

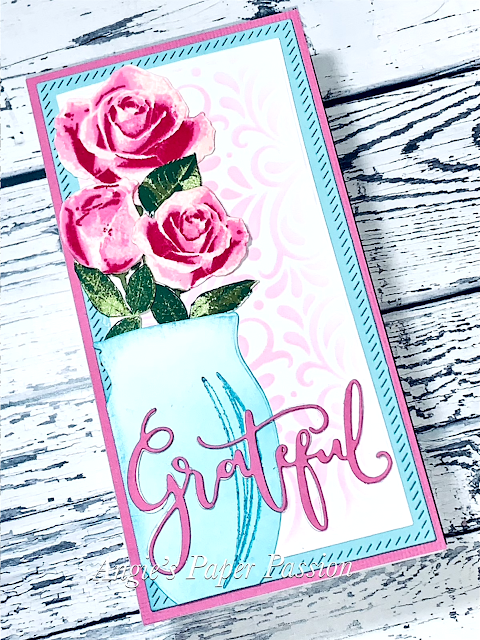
 Hello Crafters! I have created a Mini Slimline Thank You card for Maria Colosimo of Kitchen Sink Stamps. She has the most beautiful stamp sets that I've ever seen! They make very detailed and realistic images. The Modsquad Challenge is to create a Thank You card for Maria using Kitchen Sink Stamps.

I used the very first stamp set that I ever purchased from Kitchen Sink - Hearts & Roses. To create each rose and leaf image there are three to four stamps that you just layer with coordinating ink colors to achieve the intricate and detailed final images. All of her stamps are so detailed and fun to create.

I started with the flowers and used inks from Gina K Designs and Pinkfresh Studio from the palest pink to a really pigmented pink to achieve the look of the roses pictured. This set does not have a die set to match but Kitchen Sink Stamps offers an SVG file with their sets. I can use that SVG file on my Cricut Maker or Explore to cut out all of the images (and as many as I want). After I cut the images with my Cricut I just stamp the cut outs. 

I die cut the white and teal cardstock with the Pinkfresh Studio Mini Slimline Die Cut Bundle. Then I used the Harvest Stencil from Gina K Designs and a pink ink to create a soft background. I die cut the vase from GKD Fearless Joy stamp & Die set to place my roses in and inked it in a teal color.

The 'Grateful' sentiment is a GKD die from the new Fluttering Fall Bundle.

While I was stamping these beautiful roses I decided to grab more coordinating ink colors and made many more roses in different colors for future projects. They are so addicting to make!

Well, I hope that you enjoyed seeing my Thank You card for Maria! I hope she enjoys it also! Hop on over to the Modsquad Challenge Blog and play along!

Thank you for dropping by! Until next time, Happy Crafting!

Color Hues Yellow & Pink Challenge #23 and Honey Bee Stamps Coneflower

Hello Crafters! I've decided to take on a few card challenges and the first one is over at Color Hues. Their challenge is to use Yellow & Pink as the focal color.

As soon as I saw this challenge I knew immediately that I wanted to create something with my new Coneflower dies from Honey Bee Stamps! I love this set and it's so hard to not want to grab it each time that I want to make a card. Here is my card!


I die cut the flower from Gina K Designs heavyweight white cardstock and blended GKD Wild Dandelion, Sweet Corn, Prickly Pear, Dusty Rose and Passionate Pink inks onto the six different layers of the flower and adhered them together. I popped the petals up using pop dots. 


I used a stencil from A Colorful Life Designs and two of the yellow inks to make my own background for the card. I cut three large and three small frame dies from PinkFresh Studio and adhered them together for a little dimension and placed them on my background panel and used pop dots to adhere the coneflower in the middle. The sentiment is a stamp and die also from PinkFresh Studio that I heat embossed in gold. Gold just seemed to compliment the GKD Kraft cardstock that I cut my frames from. To finish it off, I added some yellow & pink gems from Queen & Co.

This is my first time playing along with the color challenge at Color Hues and I can't wait for their next challenge! 


I'll be posting more cards that I made for challenges this weekend so until next time, Happy Crafting!


Thankful, Grateful, Blessed

Hello Crafters! I have a Thanksgiving card to share today. I really enjoyed creating this one because I used some new (to me anyway) tools and techniques. Most of the supplies are from Gina K Designs - my new favorites! 

Gina has a Wreath Builder system that is so easy to use but the results are spectacular! 
Here is the link to the Wreath Builder Templates:


With these two templates you can create the most beautiful stamped wreaths for cards and so much more. Gina has several wreath builder stamp sets to go with the templates but you can really use any stamp set that has small to medium stamps included.

So here is the Thanksgiving card that I made with the Wreath Builder -


Along with the Wreath Builder Template I used the Wreath Builder Stamp Set, the Autumn Wreath Builder Stamp Set, the Take Care Stamp Set and Gina K inks to create the gorgeous wreath at the center of my card. I stamped the sentiment and the circle border - both from the Autumn Wreath Builder Stamp Set  - then cut it out with a circle die cut which I popped up with pop dots in the wreaths center. 
The lower background looks like patterned paper, doesn't it? Nope, its plain white cardstock that I used a stencil on. It's the Gina K Designs Sassy Stripes Stencil (love that name 😊)


I turned the stencil so that the stripes were vertical, taped the paper to it and, using a blending brush, blended the ink onto the cardstock. Always start blending with a very light hand and if you need more color just add a little more ink but use that light hand. Trust me, a lighter touch is key to blending!

Since I don't have some of those 'fancy' dies, I took a die that I do have and used it in a different way! The bottom scalloped on the top two layers was cut using a Lawn Fawn Scalloped Rectangle die. I put the corner of my two top layers into the corner of the die making sure that the rest of the card was on top of the die as it went into my Vagabond.
 
For a finishing touch, I added three coordinating buttons and some twine. 


Here is a peak inside my card. I love putting a little something on the inside to make it look just as nice as the front of the card. I used the same stamps that I used in the wreath on the front and stamped them on the bottom inside corner.


I hope that you enjoyed seeing this card as much as I enjoyed making it! So until next time, Happy Crafting! 


LinkWithin