I’m Back! (could it be because of all the New Cartridges? Hmmm!)

Yes, guys it’s me. ok, pick your jaws up from the floor! Sorry, but I needed to take a small break due to LIFE! I have really missed “talking” to you guys. I love to blog and share things with you.  But before I moved any further, I just wanted to let you know of all the new cartridges that PC has released just in the month of June. Remember that the third Thursday of the month is called ‘Hello Thursday’ and that is when the new carts are announced. Well they had THREE, yes three, Hello Thursdays this month! I know, it scared me too. What was I going to rob to satisfy my cartridge cravings? Oh, come on now, do you think I look like the type that would do such a thing? Those who know me well are NOT allowed to answer that! Any hoo, back to those new carts. The first Hello Thursday offered 4 of the Lite Cartridges and 1 Full cart. They are:

Cricut Lite 9 Months


Cricut Lite Sweet Shop

Cricut Lite Love You a Latte

Cricut Lite Recess

And last, a Full Cartridge,

Country Fair

So many goodies to choose from! Tomorrow I’ll post the 2nd round of Hello Thursday cartridges and on Monday the last round. So which ones do you think that you’ll end up bringing home? Or which carts will at least end up on your Wish List? Let me know in a Comment for the next three days each and become a follower, if you’re not already, and I’ll pick someone to receive some Blog Candy! How does that sound? It’s the least I can do for you for being absent for a while.

Remember to comment all three days to be eligible for the drawing! So until tomorrow, Happy Crafting,

Signature

Origami Folded Mini Album

This is the Origami Mini Album that I posted on my blog last month but I didn’t give any details about it. So I finally did this tutorial for you – just a little late but I hope that you enjoy it! These are really easy to make and they make very nice gifts. I made several as little Mother’s Day gifts for friends a few years ago.

Origami Album

You’ll need:

  • Two pieces of chipboard – 4”x4” each
  • Four pieces of patterned paper – two @ 4.5”x4.5” (the floral paper in my photos) for the mini album covers and two @ 3 7/8” x3 7/8”  (the green) for the inside covers. I used double-sided paper from the Sweet Nectar stack by K&Company
  • Wide ribbon – about 2 feet. I just used some wired ribbon from my stash
  • Three pieces of cardstock – 8”x8”
  • Strong adhesive – I used my trusty ATG!
  • Any embellishments of your choice for your pages – Used my Cricut of course!

Origami Album  (1)

ok. let’s start! Put your adhesive on one side of both pieces of your chipboard. Place these, adhesive side down, centered on the 4.5x4.5 pieces of the patterned paper like the example on the right side in the following photo.

Origami Album  (2)

Cut the corners off of the patterned paper almost to the tip of the corner of the chipboard. (Don’t cut the patterned paper all the way to the corner of the chipboard!)

Origami Album  (2)

Now put adhesive on each of the four sides of the patterned paper ‘tabs’ that you just created and then fold them over onto the chipboard. This makes really nice mitered corners.

Origami Album  (3)

Now take the smaller two pieces of patterned paper (the 3 7/8” by 3 7/8” squares) and place adhesive on them making sure that they get a good coverage of adhesive, especially on the edges, corners, and center. You are going to have to use your imagination for this part! I forgot to take that photo and didn’t realize until now – after the album is glued together!                         Sorry!Embarrassed smile

You have just created the covers for your mini album! Now on to the inside and the ‘origami’ folding using the three pieces of cardstock. I did take photos of this part – I promise. This part uses just 3 folds per piece! I used a scoring board to make the folding easier. Trust me, it really does help to have one of these!  I actually have two – the Scor-Pal and the one by Martha Stewart shown in the photos. A bone folding tool also helps by making your folds nice and crisp!

Origami Album  (29)

First, score and fold the first piece of cardstock in half diagonally…

Origami Album  (30)

and use your bone folder to crease.

Origami Album  (31)

Open the folded cardstock, and turn it over and make the next two folds in the opposite direction. (This will make sense in a minute). Now fold in half from side to side like this:
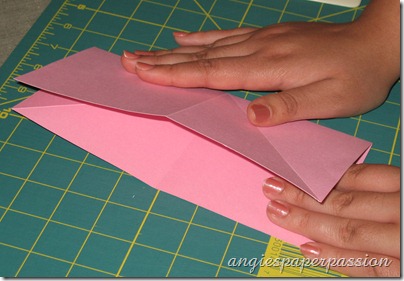
Origami Album  (32)

Now unfold and fold again in half from top to bottom.              Unfold again.                                                                                                           

Now when you press the two opposite creased corners in towards the center…
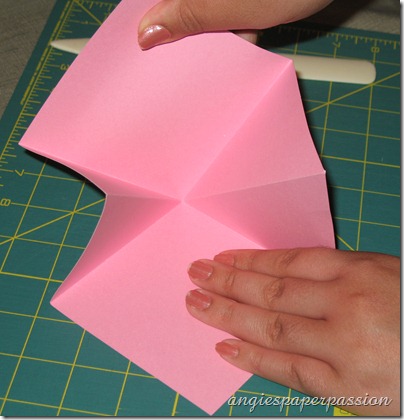
Origami Album  (33)

the other two corners will automatically collapse together…

Origami Album  (8)

Don’t forget to use your bone folder on all folds!
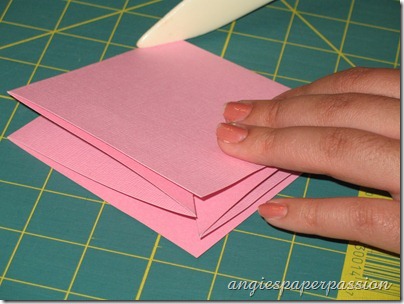
Origami Album  (35)

Repeat these steps with the other two pieces of cardstock. You are now going to adhere the three pieces together. Put adhesive on one of the folded pieces (again making sure to put adhesive close to all edges, corners, and good amount in the middle – you don’t want your mini to fall apart when it is opened!) and adhere two together with the ‘openings’ facing in opposite directions…

Origami Album  (36)

Adhere the third piece next with its ‘opening’ going in the same direction as the first, or bottom, piece of cardstock. I hope this all makes sense, lol! Your three pieces should look like this:
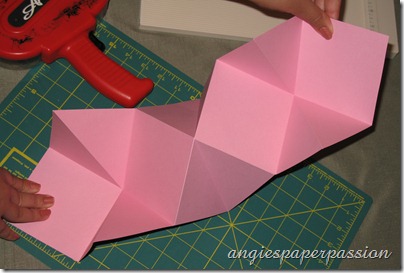
Origami Album  (40)

Origami Album  (41)

Now, let’s put it all together! With the inside pages all folded, put adhesive on one side (again, don’t skimp on the adhesive!)…

Origami Album  (43)

and place one of the covers on top, eyeballing the placement and making sure that the cover is centered on the ‘pages’…
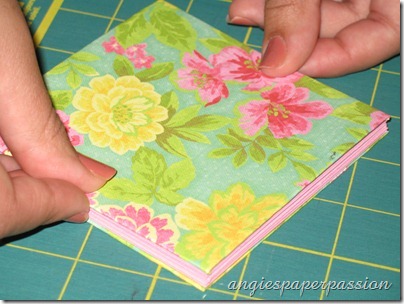
Origami Album  (44)

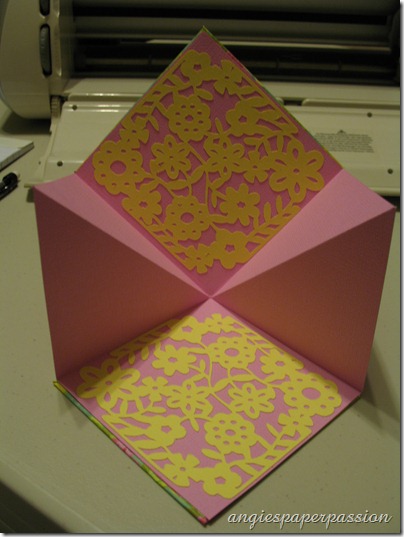
Turn your album over and repeat, adhering the second cover. When you open your mini album, it will look like this…

Origami Album  (45)

and this…

Origami Album  (46)

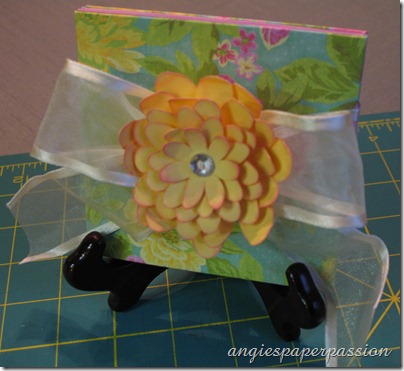
You now have six 4”x4” square pages to place photos or journaling – four on one side and two on the other side when you turn the album around. There are also 12 squares that are folded in half giving you 24 triangles to embellish! Those triangles are great for journaling! For the closure, I used my wired ribbon to wrap around the mini and tied it into a bow. I love the wired ribbon because it holds its shape. This way you can just slip the ribbon off the mini without having to untie it! I used the Paper Lace cartridge, my Expression, and Gypsy to cut out the same image that I used on the front of my glass block in a previous post and just cut two in a smaller size and adhered them to a couple of the inside pages. I plan on embellishing the inside some more before I give it as a gift!
Origami Album  (12)

Here is my final mini album -

Origami Album  (49)

I can’t seem to stop making paper flowers lately! So I just had to make another one of my 8-layered flowers, with some bling added, and adhere it to the ribbon:
Origami Album  (53)

I hope that you give this a try enjoy creating your own Origami Mini Albums! If you have any questions please email me. Thanks for visiting!

Until next time, Happy Crafting,

Signature

New From Jetmax!

Well, new to me at least! I am really into the whole Jetmax storage cubes right now – this better not be a fade ‘cause I’ve spent way too much on them so it better last! - and I’ve been searching for the one piece that I can never find – the file cube with only one drawer. Well, after teaching my SDU class tonight, I went to the Jetmax section and there it was! I felt like I had found the pot of gold at the end of the rainbow or hit the Jetmax cube lottery! As I was grabbing my cube, I saw something that I had never seen before. A Jetmax Cricut storage organizer!

CIMG0248

You can store your Cricut machine in this. And that’s an Cricut Expression on the box so it’s big enough for that. (Please excuse these photos, I took them with my phone.)

CIMG0247

A closer look. Now, I like the place at the very top for the Cricut markers (I don’t have many of those anyway) and the little shelf at the back, but for storing Cricut boxes like they have done here – please, don’t make me laugh! That little space wouldn’t hold any of my cartridges! – does anyone really have only have THREE cartridges? – I guess I could use that area to store my Gypsy stuff.

Here’s a photo of it closed:

CIMG0249

Nice, but I think that I use my Cricut too much to have to open this over and over again. – I may have to eat my words if you come by my house in a few weeks and see one of these in my scrapbook room! - But I do love that they are making more types of storage and also thinking about us Cricuteers! Thank you Jetmax! It costs $59.99 at Michaels but you can always use a coupon and my Mike’s only had 2 in stock.

Just thought I’d share. Michaels is redoing their entire scrapbooking department and I am told that there are a lot of new items coming soon. I’m looking forward to seeing new scrapbooking products and I hope they won’t disappoint. I’ll keep you posted!

PS – here’s a coupon, just in case!

coupon2

Until next time, Happy Crafting,

Signature

Control Those Ink Pads!!!

In the process of redoing my craft room I realized that I had WAY too many ink pads –not that I’m complaining, mind you- and I didn’t have any kind of plan to tame my growing collection. Until I found these two tips. The  first tip was found at Rebel Inker. Stacey King has a pdf file that you can download with instructions for making this ink pad holder that uses only 2 pieces of foam core board. She used white foam core in her tutorial but I decided to use black and I got it at Hobby Lobby when it was on sale at 50% off- I’m ALWAYS looking for a good deal!

IMG_4589(Now I didn’t say that I was a master builder, ok? This is as good as it gets!)

This system was made to fit the Stampin’ Up! Ink pads but I found that with a little tweaking, you can use the basic pattern to create a number of configurations, not just for ink pads but for all kinds of storage.

IMG_4590

It wasn’t that difficult to put together. I guess the hardest part was just cutting the foam core nice and straight. There are 5 compartments for the ink pads and each compartment holds 12 pads – again, these are SU pads. There is even a place to store your re-inkers at the top!

IMG_4591

Because I bought the 2 pieces of foam core at 50% off, this project cost me about $5.00! Now what am I gonna do with the other 100 other brands of ink pads? LOL! More to come on that one. After I figure it out!

The other solution that I found was for my Tim Holtz Distress ink pads. –Hold on for a minute, ARed heartT! ok! I’m better now!

IMG_4676

I like to use his inks with Inkssentials ink blending pads and Tim’s wooden tool. ok, did I just say that? That didn’t sound good -I’m really a good girl! But I didn’t want to get the inking pads & colors mixed up. SoLight bulb! I went back to Hobby Lobby –right, any excuse!- to purchase Velcro squares that were stick-on and some more ink blending foams.

IMG_4677

I first stuck the rough side of the Velcro on the back of the ink pad and the softer side on the back of the blending foam.

IMG_4679

Next step was to put the blending foam on the ink pad:

IMG_4681

Now, when I need to use a certain color of ink, I grab it, take the blending foam off the back and stick it to the blending tool!

IMG_4683

IMG_4685

Even with the piece of Velcro between the pad and the tool, I have no problems at all getting a smooth, even color on my project. When I’m finished, I just reverse it – take the pad off the blending tool and place it back onto the bottom of the ink pad.

IMG_4686

Easy as pie! Give it a try! If you do try either one of these storage tricks, please comment on this post and let me know. I just want to know if you like getting some tips & tricks on storage, scrapbooking and cricut related items also.

Dakota Bear, I hate to do this, but I can only give you until Wednesday, March 9th to contact me for your Blog Candy. After that date, I’ll have to pick another name!

Thanks for looking and until next time, Happy Crafting,

Signature

LinkWithin
