Baby Gift Bag

Well, it’s a new year and my new Grandson will be here very soon! (Less than 2 weeks!) So today I’d like to share with you a gift bag that I made that’s perfect for a new baby gift! (Sorry about the photos, it’s been overcast here for several days – not great photo taking weather!)

BabyGift02

I started with a large white plain gift bag from Michaels and added cardstock and patterned paper as the base. I cut the stork and baby from the New Arrival cartridge and the crib, mobile, and onesie from the 9 Months cartridge.

BabyGift03

BabyGift06

I added a doily that I sprayed with Glimmer Mist under the baby and stork.

BabyGift04

I love using lots of layers on my cuts and putting pop dots between the layers to give my images even more dimension. Then I added some Glossy Accents and Distress Inks to my cuts. The rug is just a circle that I modified in Cricut Craft Room and turned into an oval. I created the tag with my Grandson’s initials on it in CCR by welding a 2” circle to a 3.5” x 2” rectangle using shapes from Cricut Craft Room Basics. Then I welded a slightly smaller rectangle inside the larger one to create an open ‘window’ and then welded his initials in the opening using Gypsy Font. I cut an extra tag layer without the window and initials as a base and used pop dots between the two layers. A mini brad and twine are the finishing touches.

BabyGift05

One of the little gifts that I am adding to this gift bag is a hat that I knitted myself with my Knifty Knitter (which is also made by Provo Craft!) I hope that he will be able to wear it when he comes home from the hospital.

BabyGift07

Here is the cutting recipe:

New Arrival -

  • baby – 2.5”
  • stork – 3.5”

9 Months -

  • onesie – 2.3”
  • crib – 4.5”
  • mobile – 4” (image was flipped in CCR and a skinny rectangle from CCR Basics welded to the mobile to make it taller)

BabyGift01

Thanks for visiting and keep watching for more baby projects that I’m making for the baby shower!

Until next time, Happy Crafting,

Signature

Merry Christmas!

To all of my Dear Readers, I wish you all a wonderful, peaceful, and merry Christmas! 

How do you wrap perfect love?

God found a way.
Enjoy the miracle.
Thanks be to God for His indescribable gift!

II Corinthians 9:15


My little Santa Paws!
Signature

Paper Bag Album

I have always wanted to make a Kathy Orta album. So when I joined the annual Cricut Circle Secret Santa Swap and one of the items that we had to give our secret sister had to be hand made, I knew that this was the perfect opportunity. Kathy is owner of the Paper Phenomenon blog. I made her Ultimate Paper Bag album and this is how mine turned out!
ChristmasCircleStockingSwap01
There is only one detail that I used my Cricut for – the paper flowers on the front cover. I used Close To My Heart’s Art Philosophy cartridge. I am so addicted to making these rolled flowers.
ChristmasCircleStockingSwap02
The little frame is from Michaels. I took off the back easel and adhered it to the album on just the bottom and sides so that my secret sister could put a photo of her choosing in it by just sliding it in through the top. The gem swirl is from Want2Scrap, the cardstock is from The Paper Studio, and the patterned paper is from a paper stack called Sweet Nectar by K and Company. 

The leaves are by Prima - (remember the 6 little bottles that came together in the cute little crate from years ago? Yeah, I still have them all and this was the first time that I've ever used the bottle of leaves! See, there is a good side of hoarding scrap supplies! lol) 

The only other items used were chipboard for the front and back covers, Distressing Ink in worn lipstick by Tim Holtz, and the binding. 
Can you guess what the binding is?
ChristmasCircleStockingSwap04Duck Tape!!! Even though it’s everywhere now, this is my first time using it. I’m always a little late jumping on that band wagon but I eventually get on!
ChristmasCircleStockingSwap03
It’s hard to believe that this really is made from paper bags! There are just two basic page designs and many, many pockets for many, many tags! I wanted the album theme to be rather neutral so that my secret sister could use it in any way that she wanted to. I just made sure that it had her favorite colors (pink, green and blue) and coordinated with her favorite season (Spring).  One of the page styles has two smaller flaps on either side with large tags inserted into them and both page styles flip up to reveal even more space. Below are more photos that I can show since my secret sister has now received her package and knows what she got and from who (I hope you like all of your goodies, CricutAddicted!).
ChristmasCircleStockingSwap05ChristmasCircleStockingSwap06ChristmasCircleStockingSwap07ChristmasCircleStockingSwap09ChristmasCircleStockingSwap10ChristmasCircleStockingSwap12ChristmasCircleStockingSwap13ChristmasCircleStockingSwap15ChristmasCircleStockingSwap20ChristmasCircleStockingSwap18ChristmasCircleStockingSwap19ChristmasCircleStockingSwap21ChristmasCircleStockingSwap23ChristmasCircleStockingSwap25ChristmasCircleStockingSwap27ChristmasCircleStockingSwap28ChristmasCircleStockingSwap29
Thanks for looking! I’ll post what I received from my own secret Sister soon!
Until next time, Happy Crafting!
Signature

Cricut’s Rudolph, the Red Nosed Reindeer!

I was very intrigued by the 3-D Rudolph Head that is a Cricut Craft Room Exclusive image at Cricut.com. So when it was offered as a freebie a few weeks ago, I decided to give it a try. I love that PC gives us a free cut file once a week. It gives you a chance to try something that you may not have thought that you’d like or were interested in and lets you have a test drive with it. And all you need is the Cricut Craft Room which is absolutely free! You can find CCR HERE. It comes with Craft Room Basics and each week just look under My Cartridges in CCR to use the free file as many times as you’d like for seven days!

So here is my 3-D Rudolph: 


I hung him on the inside of my front door and placed a wreath around him. I just used Kraft cardstock and one sheet of red glitter paper. There is a sheet of fun foam that I hand cut using the shield as a pattern to make it a bit sturdier. So he was very quick and easy to make and put together.

Until next time, Happy Crafting,

Signature

Children Around the World

A couple of months ago I was up to my eyeballs in, well, eyeballs!!!

CATW African Girl 05

I know, looks weird, right? But wait until you see what they were for! I joined a swap on the Cricut Circle message board that was hosted by the fabulous Renee, aka RockinRenee. It was for the cartridge, Children Around the World. When it first came out, it reminded me of the Disneyland ride, It’s A Small World, and I knew that I had to have it! We picked one of the ‘children’ and made 25 each. Well, somewhere between reading that and actually making them, I had a senior moment and cut out FIFTY kids instead! So now imagine those eyeballs – 1 doll x 2 eyes x 2 pieces per eye = 200 itty bitty pieces of cardstock!!! There were eyes everywhere! Even now, two months later, I can find eye pieces on the carpet around my work table. But it was worth it!

I choose the African girl. Here are photos of my kids in progress:

CATW African Girl 10I tried to pick different shades of cardstock to represent my girls from Africa (since we are women of color – many different colors!) even though for me it is so hard to pick cardstock to represent any correct shade of skin tone!

CATW African Girl 03Besides the eyes, the really only other small pieces were the little sandals. But since we all cut out our kids at 5” it wasn’t that difficult at all to put them together. There were pieces for my girls hat and her dress.

CATW African Girl 04I think I’m more excited about this part than any other! I used several different patterned papers for all of the dresses and it ALL came from my stash!!! I didn’t plan it that way but I’m so happy that I was able to use papers that I had on hand. It feels like such a big accomplishment to me!

CATW African Girl 08And here are my girls! Don’t they look so cute and fun? I’m happy about the way they came out.

CATW African Girl 06Each doll on the cart also comes with a companion image – mine was the hut – so I used CCR to make the hut into a Thank You card for our hostess, Renee.

When you are part of a swap, one of the best parts is receiving your swap package from the hostess with everyone else’s creations. And I so excited when my package arrived! The other ladies did a fantastic job with their kids. There is so much added detail to each. I am so amazed with my Circle sisters! I am linking Renee’s post on her blog, I Came, I Saw, I Created,  with all of the 25 children so that you can see how lovely they all are. And while you are there, take some time to look around her blog – Renee has so many wonderful and beautiful projects to share! Tell her that Angela sent you to visit!

Until next time, Happy Crafting,

Signature

My heart hurts.....

... in more than one way today! I'm sorry that I haven't posted for a while but I've had some serious health problems and concerns but I'm working with my doctor to get well. But today my heart breaks again for the families in Newtown, CT. It's just not right, not this early in their young lives, not at this time of year, not at anytime! Please continue to pray for all those who were personally touched by this horrific tragedy and those parents, grandparents, and siblings of the 20 little Angels and the six who tried to protect them.

And if you have a small prayer left over, I'll be blessed to have any that you can send up.
Thank you and God bless you!

Signature

Christmas Reindeer Treat Holders–Cricut FANatics

Hey everyone! It’s my day to post a project on Cricut FANatics and I wanted to share these treat holders with you. They are cute, easy to put together and I’ll show you different ways to use them this Christmas.

Reindeer1

I saw something like these several years ago made with punches and I had always wanted to make some but never got around to it. Now that I have my Cricut, I am always trying to make life a little easier by recreating projects from years ago using my Expression along with either my Gypsy or more than ever now with Cricut CraftRoom. For this project I used December 25th cart by Teresa Collins and Cricut Craft Room Basics. I love putting most (if not all) of my cardstock for a project on my cutting mat and making just one pass through my Cricut at one time. So even though there are eight different colors to make a reindeer, I only had to do two passes with my Expression.
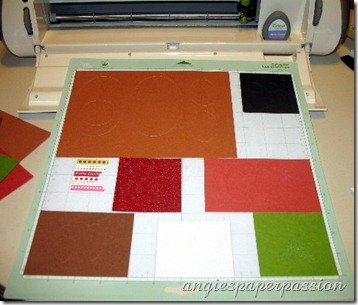
Reindeer05

I used the Sweet Treat Cups from Stampin’ Up! for the reindeer noses. You get 12 cups for less than $3!

Reindeer01

In one nose I placed red Skittles. You can use Red Hots, red M&M’s, or anything that you’d like to use. In the other nose I used red glitter that I adhered with Glossy Accents and after it dried, I placed oats in the cup. These are to be used on Christmas Eve as “Reindeer Food”.  (Note – you may want to use red colored sugar crystals instead of glitter so as not to harm birds or other little critters)

Reindeer07

I did the “Reindeer Food” with my kids when they were little and they loved it! There is also a little poem that goes with it that I’ll share at the end of this post. After cutting out all of the parts of the reindeer, I inked all of the edges, added red Stickles to the holly and one of the ornaments, Glossy Accents to another ornament, popped the eyes and eyelids up with pop dots, and added the highlights to the eyes with a white gel pen.
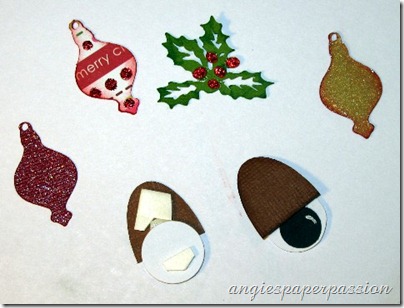
Reindeer04

Can you guess what I used for the antlers???

Reindeer06

The antlers from the deer on the December 25th cart! I cut out two with one flipped and that gave me two sets of symmetrical antlers. I just cut them off by hand. Everything is then glued to the base (the one without the hole in it) and a piece of ribbon was attached to the tops with my Tiny Attacher (love this tool!).

Reindeer09

Then you attach the cup with your treats (or the reindeer’s treats) inside and adhere it to the base. The cups already come with adhesive on them. Next, just place the face on top, attach the eyes and holly, and draw his mouth (I can not draw so excuse his lopsided mouth!).
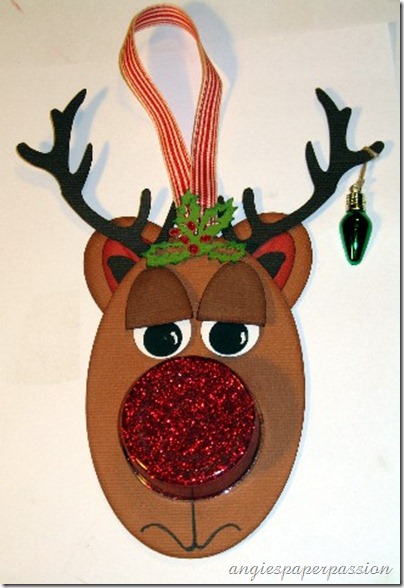
Reindeer02

Reindeer03

After I put them all together, I found these plastic Christmas lights in my stash and used these instead of the ornaments that I had cut out. I just tied them on with some SU twine.

Here is the poem that I will use (these are not mine, I have just been using them for many years so I do not know where I found them):

Magic Reindeer Food -

Sprinkle this reindeer food outside on Christmas Eve night

The moon will make it sparkle bright

As Santa’s reindeer fly and roam

This magical food will guide them to your home.


Or I may even use one of these:


I wanted the perfect gift for you- 
But couldn’t decide just what to do.
 
I almost sent you a dozen roses-
 
Instead here’s a bag of…
 
reindeer noses!

I woke up with such a scare when I heard Santa call...
"Now dash away, dash away, dash away all!"
I ran to the lawn, and in the snowy white drifts,
those nasty reindeer had left "little gifts".

I got an old shovel and started to scoop
Neat little piles of "reindeer poop."
but to throw them away seemed such a waste,
So I saved them, thinking you might like a taste!

As I finished my task, which took quite a while,
Old Santa passed by and he sheepishly smiled.
And I heard him exclaim as he rose to the sky~~~
"Well, they're not potty trained, but at least they can fly!"


Thank you for visiting and I hope that you enjoyed my Christmas Reindeer!


Christmas Reindeer Recipe:


From December 25th -

Holly @ 1.222

Ornament @ 1.431

Antlers – Deer @ 4.417 x 8.583

From Cricut Craft Room Basics -

Circles – 1 @ 4.25 x 2.75 (base)

                   1 @ 4.25 x 2.75 (with a 1.75 x 1.75 circle welded inside for the face)

                   2 @ 1.75 x .875 (eyelids)

                   2 @ 2 x 1.375 (outside ears)

                   2 @ 1.75 x .875 (inside ears)

                   2 @ .5 x .5 (eyes in black)

                   2 @ .75 x .75 (eyes in white)


Until next time, Happy Crafting,


Signature                  


LinkWithin
